Dear IT Pros,
Today we discuss about All things about WDAC – Windows Defender Application Control.
WDAC was introduced with Windows 10 and could be applied to Windows server 2016 and later, its older name is Configurable Code Integrity (CCI). WDAC allows organizations to control which drivers and applications are allowed to run on devices.
- Windows Server 2016/2019 or anything before version 1903 only support legacy policies (aka 1 policy in place)
- Windows Server Core edition does support WDAC but some components that depends on AppLocker won’t work
WDAC policies apply to the managed computer as a whole and affects all users of the device. WDAC rules can be defined based on:
- Attributes of the codesigning certificate(s) used to sign an app and its binaries
- Attributes of the app's binaries that come from the signed metadata for the files, such as Original Filename and version, or the hash of the file
- The reputation of the app as determined by Microsoft's Intelligent Security Graph
- The identity of the process that initiated the installation of the app and its binaries (managed installer)
- The Folder or File path from which the app or file is launched (beginning with Windows 10 version 1903)
- The process that launched the app or binary
Multiple Policies and Supplemental Policy.
Beginning with Windows 10 version 1903, Windows server 2022, WDAC supports up to 32 active policies on a device at once. The following scenarios are supported:
- Enforce and Audit Side-by-Side
- Multiple Base Policies, users can enforce two or more base policies simultaneously in order to allow simpler policy targeting for policies with different scope/intent.
- If two base policies exist on a device, an application has to be allowed by both to run
- Supplemental Policies, users can deploy one or more supplemental policies to expand a base policy. For supplemental policies, applications that are allowed by either the base policy or its supplemental policy/policies are allowed to run
PLANNING.
Implementing application control can have unintended consequences, plan your deployment carefully.
- Decide what devices you will manage with WDAC and split them into deployment rings: Test, UAT and Prod ring, so you can control the scale of the deployment and respond if anything goes wrong.
- All WDAC policy changes should be deployed in audit mode before proceeding to enforcement. Carefully monitor events from devices where the policy has been deployed to ensure the block events you observe match your expectation before broadening the deployment to other deployment rings.
- If your organization uses Microsoft Defender for Endpoint, you can use the Advanced Hunting feature to centrally monitor WDAC-related events. Otherwise, we recommend using an event log forwarding solution to collect relevant events from your managed endpoints.
- Leverage medatada in the policies (version, policyID, description, etc) to keep track of which policies applied to what group of devices in production.
Options For WDAC Policy Creation:
The creation of an WDAC Policy depends on the level of restriction you may want to apply to your target devices. You could start with a pre-built template of Windows 10:
|
Level of Restriction |
Template to be used (C:\Windows\schemas\CodeIntegrity\ExamplePolicies) |
|
Allowed All Applications |
AllowAll.xml |
|
Allowed All Enabled HVCI |
AllowAll_EnableHVCI.xml (Enable Hypervisor-Code-Integrity in Memory) |
|
Allowed All Microsoft Applications |
AllowMicrosoft.xml |
|
Allowed All Microsoft and Good Reputation Applications |
DefaultWindows_Enforced.xml or DefaultWindows_Audit.xml |
|
Deny All Applications but the one you choose |
DenyAllAudit.xml |
|
Other pre-built .xml template for Application or Script Control |
|
|
Allowed Application deployed by Microsoft Endpoint Configuration Manager (MECM). |
WDAC Policy deployed to Clients at directory location: %OSDrive%\Windows\CCM\DeviceGuard
|
|
Device Guard Signing Service (DGSS) DefaultPolicy.xml |
Including the rules from DefaultWindows and adds rules to trust apps signed with your organization-specific certificates issued by the DGSS version 2 |
- You could use WDAC Wizard to view and customize the allow or deny rules applied to different applications.
- Every WDAC policy is created with audit mode enabled by default. After you have successfully deployed and tested a WDAC policy in audit mode and are ready to test the policy in enforced mode, use WDAC Wizard to turn off Audit mode this will make the WDAC Policy become Enforced mode. You also could use command in an elevated Windows PowerShell session to make WDAC Policy in Enforced mode:
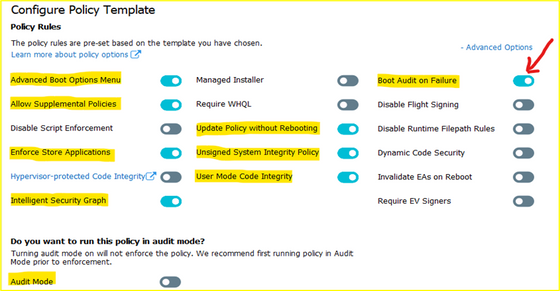
- Ensure that rule options 9 (“Advanced Boot Options Menu”) and 10 (“Boot Audit on Failure”) are set the way that you intend for this policy. We strongly recommend that you enable these rule options before you run any enforced policy for the first time. Enabling these options provides administrators with a pre-boot command prompt and allows Windows to start even if the WDAC policy blocks a kernel-mode driver from running. When ready for enterprise deployment, you can remove these options.
- To ensure that these options are enabled in a policy, use Set-RuleOption as shown in the following commands. You can run these commands even if you're not sure whether options 9 and 10 are already enabled—if so, the commands have no effect.
> Set-RuleOption -FilePath InitialCIPolicy -Option 9
> Set-RuleOption -FilePath InitialCIPolicy -Option 10
- Copy the initial file to maintain an original copy:
> copy InitialCIPolicy.xml EnforcedCIPolicy.xml
- Use Set-RuleOption to delete the audit mode rule option:
> Set-RuleOption -FilePath EnforcedCIPolicy.xml -Option 3 -Delete
Note
To enforce a WDAC policy, you delete option 3, the Audit Mode Enabled option. There is no “enforced” option in a WDAC policy.
- Use ConvertFrom-CIPolicy to convert the new WDAC policy to binary format:
> ConvertFrom-CIPolicy EnforcedCIPolicy.xml EnforcedCIPolicy.bin
- Now that this policy is in enforced mode, you can deploy it to your test computers. Rename the policy to SIPolicy.p7b and copy it to C:\Windows\System32\CodeIntegrity for testing, or deploy the policy through Group Policy by following the instructions in Deploy and manage Windows Defender Application Control with Group Policy. You can also use other client management software to deploy and manage the policy.
- Windows Defender Application Control policy - policy rule options
|
WDAC - policy rule options |
|
|
|
Rule option |
Description |
WDAC Wizard Icon |
|
0 Enabled:UMCI |
WDAC policies restrict both kernel-mode and user-mode binaries. By default, only kernel-mode binaries are restricted. Enabling this rule option validates user mode executables and scripts. |
|
|
1 Enabled:Boot Menu Protection |
This option is not currently supported. |
|
|
2 Required:WHQL |
By default, legacy drivers that are not Windows Hardware Quality Labs (WHQL) signed are allowed to execute. Enabling this rule requires that every executed driver is WHQL signed and removes legacy driver support. Kernel drivers built for Windows 10 should be WHQL certified. |

|
|
3 Enabled:Audit Mode (Default) |
Instructs WDAC to log information about applications, binaries, and scripts that would have been blocked if the policy was enforced. You can use this option to identify the potential impact of your WDAC policy, and use the audit events to refine the policy before enforcement. To enforce a WDAC policy, delete this option. |

|
|
4 Disabled:Flight Signing |
If enabled, WDAC policies will not trust flightroot-signed binaries. This option would be used by organizations that only want to run released binaries, not pre-release Windows builds. |

|
|
5 Enabled:Inherit Default Policy |
This option is reserved for future use and currently has no effect. |
|
|
6 Enabled:Unsigned System Integrity Policy (Default) |
Allows the policy to remain unsigned. When this option is removed, the policy must be signed and the certificates that are trusted for future policy updates must be identified in the UpdatePolicySigners section. |

|
|
7 Allowed:Debug Policy Augmented |
This option is not currently supported. |
|
|
8 Required:EV Signers |
This rule requires that drivers must be WHQL signed and have been submitted by a partner with an Extended Verification (EV) certificate. All Windows 10 and later drivers will meet this requirement. |

|
|
9 Enabled:Advanced Boot Options Menu |
The F8 preboot menu is disabled by default for all WDAC policies. Setting this rule option allows the F8 menu to appear to physically present users. |

|
|
10 Enabled:Boot Audit on Failure |
Used when the WDAC policy is in enforcement mode. When a driver fails during startup, the WDAC policy will be placed in audit mode so that Windows will be able to load at boot. |

|
|
11 Disabled:Script Enforcement |
This option disables script enforcement options. Unsigned PowerShell scripts and interactive PowerShell are no longer restricted to Constrained Language Mode. NOTE: This option is supported on 1709, 1803, and 1809 builds with the 2019 10C LCU or higher, and on devices with the Windows 10 May 2019 Update (1903) and higher. Using it on versions of Windows 10 without the proper update may have unintended results. |
|
|
12 Required:Enforce Store Applications |
WDAC policies will also apply to Universal Windows applications. (Microsoft Store App) |

|
|
13 Enabled:Managed Installer |
Use this option to automatically allow applications installed by a managed installer. For more information, see Authorize apps deployed with a WDAC managed installer |

|
|
14 Enabled:Intelligent Security Graph Authorization |
Use this option to automatically allow applications with "known good" reputation as defined by Microsoft’s Intelligent Security Graph (ISG). |

|
|
15 Enabled:Invalidate EAs on Reboot |
When the Intelligent Security Graph option (14) is used, WDAC sets an extended file attribute that indicates that the file was authorized to run. This option will cause WDAC to periodically revalidate the reputation for files that were authorized by the ISG upon Windows reboot. |

|
|
16 Enabled:Update Policy No Reboot |
Use this option to allow future WDAC policy updates to apply without requiring a system reboot. NOTE: This option is only supported on Windows 10, version 1709, and above. |

|
|
17 Enabled:Allow Supplemental Policies |
Use this option on a base policy to allow supplemental policies to expand it. NOTE: This option is only supported on Windows 10, version 1903, and above. |

|
|
18 Disabled:Runtime FilePath Rule Protection |
This option disables the default runtime check that only allows FilePath rules for paths that are only writable by an administrator. NOTE: This option is only supported on Windows 10, version 1903, and above. |

|
|
19 Enabled:Dynamic Code Security |
Enables policy enforcement for .NET applications and dynamically loaded libraries. NOTE: This option is only supported on Windows 10, version 1803, and above. |

|
USING WDAC WIZARD TO CREATE POLICY
Steps to proceed with creating the WDAC Policy by Wizard:
- Download WDAC Wizard and install it.
The WDAC Wizard has 3 options for creating, modifying or merge 2 WDAC policies as shown here:
- Create WDAC policy by Wizard
You could create single base policy or multiple base policy or supplemental policies.
- To download the WDAC Wizard: Microsoft WDAC Wizard (webapp-wdac-wizard.azurewebsites.net)
- Launch the WDAC Wizard and choose Single Policy Format
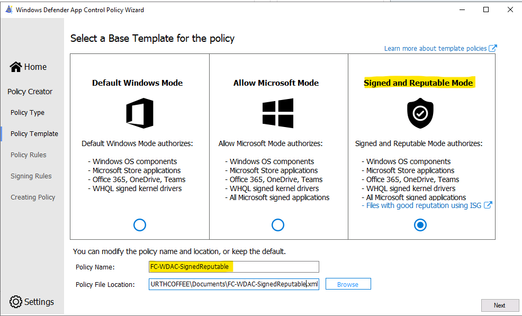
- Choose the Template named “Signed and Reputable Mode” for Microsoft and 3rd party Vendor Applications.
- Typing name for WDAC policy and directory location as shown:
- Choose the option for policy:
- Next, Adding Custom rule,
- Rule type: Choose how to identify the application by publisher name, by path to application executable file or folder, by File attributes, by Packaged App, by File
Hash:

- Custom Rule by Publisher:
Enter the executable file of the related Publisher for the Wizard to collect the Publisher Sign in Code:
- Custom Rule by File Attribute
Checking the box “Use Custom Values” and Use the glider to choose the attribute as shown here
- Custom Rule by Package App (UWP)
Packaged apps, also known as Universal Windows apps, are based on a model that ensures all the files within an app package share the same identity.
- To get a list of packaged apps run on a device, run command:
> Get-AppxPackage | ft
Typing the Package Name to the Wizard under “Package Name” and click Search button as shown:
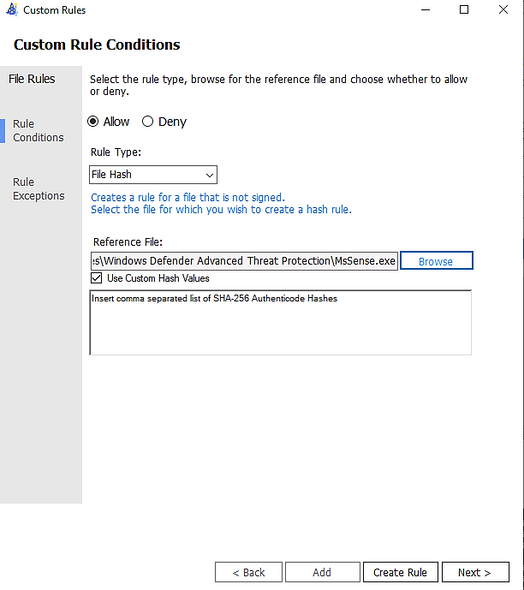
- Custom Rule by File Hash
You could add multiple file hash separated by comma with Custom rule or use the browser button and specify the file:
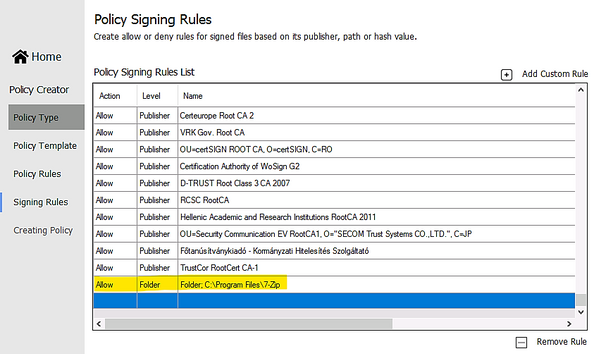
- Custom Rule by Folder Path or File Path:
- Create Rule
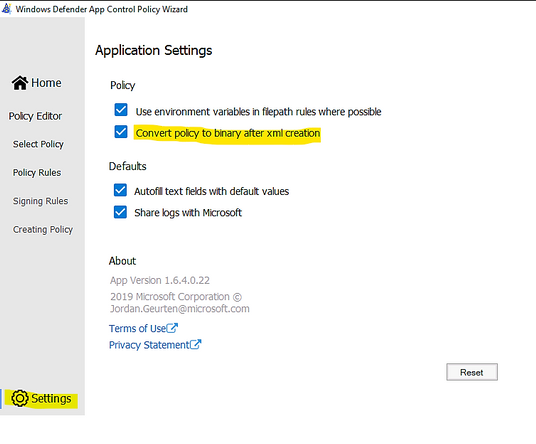
- Make sure to let WDAC Wizard to create the binary file if you need it in Settings – “Convert policy to binary after xml creation” as shown in the following:
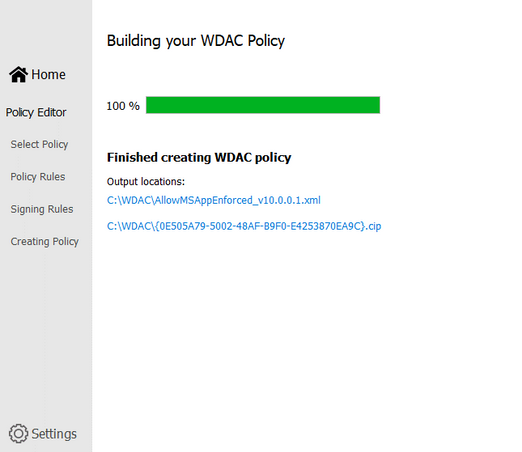
- Next, Wizard will build the WDAC Policy in xml format. You could close the Wizard once it finishes the task.
- Run Powershell, cd to the location of WDAC Policy
- Convert .xml policy to binary:
> ConvertFrom-CIPolicy .\SignedReputable052621.xml SignedReputable052621.bin
- Applying WDAC binary policy to targeted device by GPO or Local Group Policy:
- Result: After reboot the windows 10 device the first time (needed only once) for WDAC Policy to be applied. We could test the access.
To Generate new WDAC Policy from current Audit Policy
While a WDAC policy is running in audit mode, any application that runs but are supposed to be denied according to WDAC Audit Policy, is logged in the
Applications and Services Logs\Microsoft\Windows\CodeIntegrity\Operational event log. Script and MSI are logged in the
Applications and Services Logs\Microsoft\Windows\AppLocker\MSI and Script event log. These events can be used to generate a new WDAC policy that can be merged with the original Base policy or deployed as a separate Supplemental policy, if allowed.
You must have already deployed a WDAC audit mode policy to use this process.
- To generate new policy from current one by Powershell:
- In an elevated PowerShell session, run the following commands to initialize variables used by this procedure. This procedure builds upon the Lamna_FullyManagedClients_Audit.xml policy introduced in Create a WDAC policy for fully managed devices and will produce a new policy called EventsPolicy.xml.
PowerShell
$PolicyName= "Lamna_FullyManagedClients_Audit"
$LamnaPolicy=$env:userprofile+"\Desktop\"+$PolicyName+".xml"
$EventsPolicy=$env:userprofile+"\Desktop\EventsPolicy.xml"
$EventsPolicyWarnings=$env:userprofile+"\Desktop\EventsPolicyWarnings.txt"
- Use New-CIPolicy to generate a new WDAC policy from logged audit events. This example uses a FilePublisher file rule level and a Hash fallback level. Warning messages are redirected to a text file EventsPolicyWarnings.txt.
PowerShell
> New-CIPolicy -FilePath $EventsPolicy -Audit -Level FilePublisher -Fallback Hash –UserPEs -Mul
More detail here.
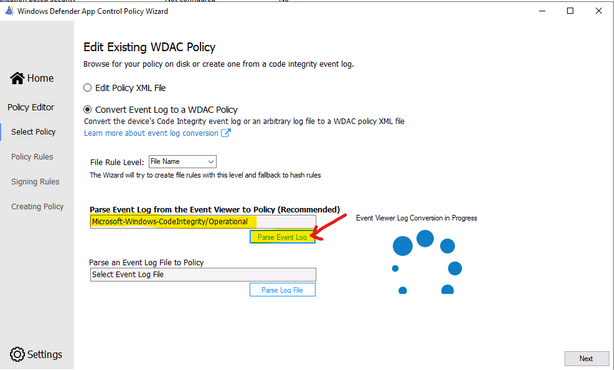
- To generate new policy from current one by WDAC Wizard:
- Run the WDAC Wizard, Policy Editor
- Enter the Event log and click “Parse…”
- When get the prompt, click OK, Next
- Next, … and close the Wizard after policy is created.
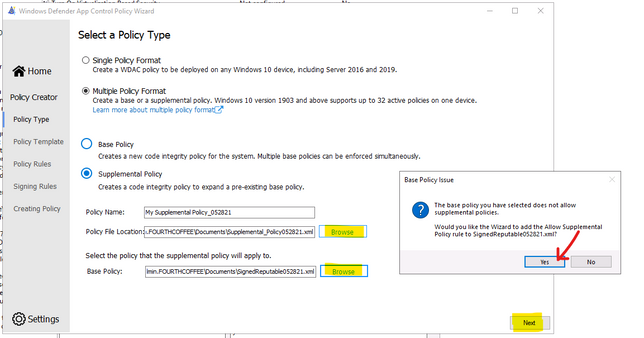
To Create Suplemental Policy from a base policy by WDAC Wizard
- Run WDAC Wizard from Windows Start Menu.
- Choose Policy Creator mode
- Click Multiple Policy Format
- Choose Supplemental Policy
- Browse to Supplemental Policy location
- Browse to Base Policy location
- Next, Create policy and close the Wizard.
DEPLOYING WDAC POLICY
There are 4 ways to deploy WDAC:
To activate the WDAC Policy binary file to WMI repository.
- Script-based deployment process for Windows 10 version 1903 and above
- Script-based deployment process for Windows 10 versions earlier than 1903
- Another option is using Github AaronLocker Script, You can easily customize rules for your specific requirements with simple text-file edits. AaronLocker includes scripts that document AppLocker and WDAC policies and capture event data into Excel workbooks that facilitate analysis and policy maintenance. AaronLocker is designed to restrict program and script execution by non-administrative users.
- Deploying WDAC Policy by GPO for Domain’s devices.
Group Policy-based deployment of WDAC policies only supports single-policy format WDAC policies. To deploy multiple policy for Windows 10 version 1903 and later, you will need to use other deploying mechanisms.
You can copy the WDAC policies to a file share to which all computer accounts have access, e.g: \\NYCCL1\WDAC\AllowMSAppEnforcedV3.bin:
- Regardless of the type of policy you deploy (.bin, .p7b, or .p7), they are all converted to SIPolicy.b7p in directory Windows\System32\CodeIntegrity\ when WDAC is applied to Client Windows 10
- For multiple policies, they are in {Policy GUID}.cip policy files found in the Windows\System32\CodeIntegrity\CIPolicies\Active folder once WDAC Policy is applied to Client Windows 10.
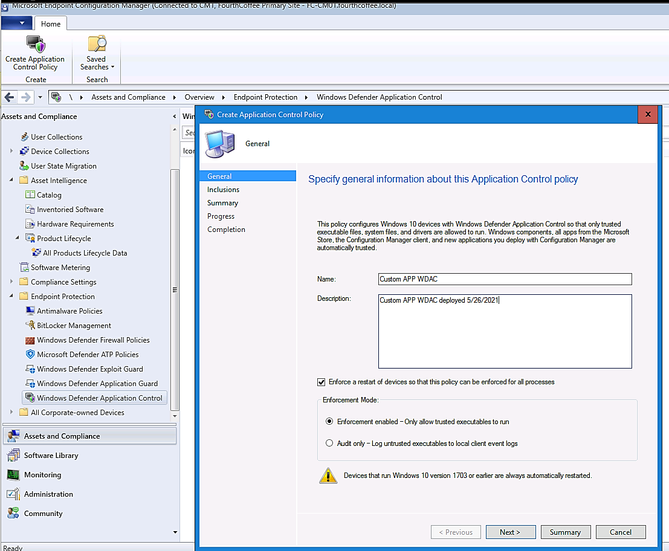
- Deploying WDAC Policy by MECM (SCCM) for Device Collection.
An Example is shown here:
> Adding File or Folder path as shown here:
> Next and Close.
- Deploy WDAC Policy by MDM (Intune)
Intune includes native support for WDAC which can be a helpful starting point, but customers may find the available circle-of-trust options too limiting. To deploy a custom policy through Intune and define your own circle of trust, you can configure a profile using Custom OMA-URI.
An Example:
- OMA-URI: ./Vendor/MSFT/ApplicationControl/Policies/Policy GUID/Policy
- Data type: Base64
- Certificate file: upload your binary format policy file. You do not need to upload a Base64 file, as Intune will convert the uploaded .bin file to Base64 on your behalf.
- Result:
After the first reboot to apply the WDAC Policy, then, only Office 365 applications, and Allowed Applications ( Acrobat DC) are able to run. Others (like Chrome) will be blocked as shown here:
Also, you could download and install applications but you could not run it as shown here:
To Monitor WDAC Events
A Windows Defender Application Control (WDAC) policy logs events locally in Windows Event Viewer in either enforced or audit mode. These events are generated under two locations:
- Event IDs beginning with 30 appear in Applications and Services logs – Microsoft – Windows – CodeIntegrity – Operational
- Event IDs beginning with 80 appear in Applications and Services logs – Microsoft – Windows – AppLocker – MSI and Script
Microsoft Windows CodeIntegrity Operational log event IDs
|
Event ID |
Explanation |
|
3076 |
Audit executable/dll file |
|
3077 |
Block executable/dll file |
|
3089 |
Signing information event correlated with either a 3076 or 3077 event. One 3089 event is generated for each signature of a file. Contains the total number of signatures on a file and an index as to which signature it is. |
|
3099 |
Indicates that a policy has been loaded |
Microsoft Windows Applocker MSI and Script log event IDs
|
Event ID |
Explanation |
|
|
8028 |
Audit script/MSI file generated by Windows LockDown Policy (WLDP) being called by the scripthosts themselves. Note: there is no WDAC enforcement on 3rd party scripthosts. |
|
|
8029 |
Block script/MSI file |
|
|
8038 |
Signing information event correlated with either a 8028 or 8029 event. One 8038 event is generated for each signature of a script file. Unsigned script files will generate a single 8038 event with TotalSignatureCount 0. |
Optional Intelligent Security Graph (ISG) or Managed Installer (MI) diagnostic events 3090, 3091, 3092
|
Event ID |
Explanation |
|
3090 |
Allow executable/dll file |
|
3091 |
Audit executable/dll file |
|
3092 |
Block executable/dll file |
- The SmartLocker template which appears in the event should indicate why the binary passed/failed. Only one event is generated per binary pass/fail.
- If both ISG and MI are disabled, 3090, 3091, and 3092 events will not be generated.
Enabling ISG and MI diagnostic events
- In order to enable 3091 audit events and 3092 block events, you must create a TestFlags regkey with a value of 0x100.
- reg add hklm\system\currentcontrolset\control\ci -v TestFlags -t REG_DWORD -d 0x100
- In order to enable 3090 allow events as well as 3091 and 3092 events, you must instead create a TestFlags regkey with a value of 0x300.
o reg add hklm\system\currentcontrolset\control\ci -v TestFlags -t REG_DWORD -d 0x300
WDAC Tips
- Quick WDAC Policy applied to a testing Windows 10 device without GPO or Deployment Mechanism:
To apply the policy immediately,
- copy the {Policy GUID}.cip binary policy created by the WDAC Wizard location to the CodeIntergrity Active Foder in :
Windows\System32\CodeIntegrity\CIPolicies\Active folder
- Reboot device after copying policy to the above folder.
- To Control Application Installation – Managed Installer:
- Specify managed installers by using the Managed Installer rule collection in AppLocker policy.
- Enable service enforcement in AppLocker policy.
- Enable the managed installer option in a WDAC policy.
Detailed steps as in Microsoft document “Configure a WDAC managed installer (Windows 10)”
- To prevent machine unbootable to Windows OS during WDAC testing period.
The denied rule of WDAC Policy related to system driver may cause a loss of OS on testing device.
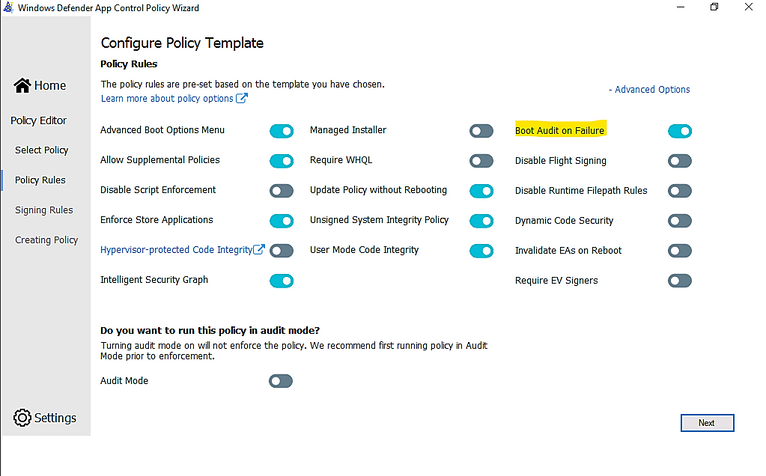
In WDAC Wizard’ Settings, please make sure to enable “Boot Audit on Failure” feature, it will automatically switch policy mode from enforcement to audit if the system drivers failed to load due to denied rule of Policy. This will save OS from loss because of driver failure in boot procedure.
To prevent loss of OS :
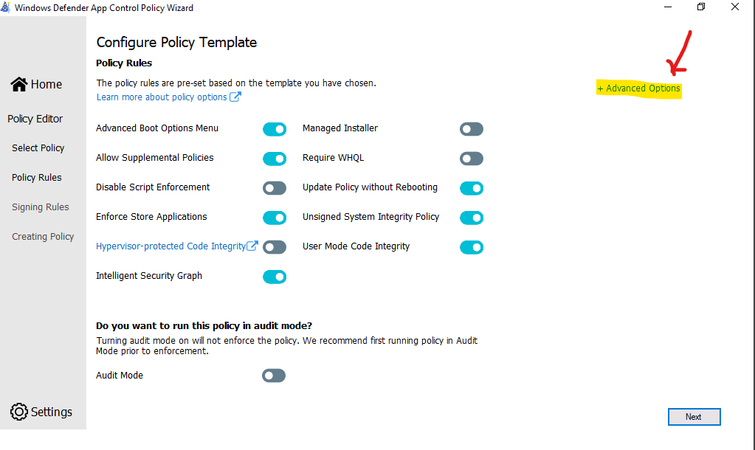
- On testing device, run WDAC Wizard – Policy Editor
- Select your Policy xml file to open it
- Policy Rules, click Advanced Options as shown here:
- Click to turn on “Boot Audit on Failure”
- Next and close the Wizard.
- In Windows\System32\CodeIntegrity\CIPolicies\Active folder, replace the old .cip policy with new cip policy and reboot the device to apply new WDAC policy.
- To Generate an WDAC rule for Universal App WUA based on package name:
- Run WDAC Wizard and Create a Custom Rule based on package App as shown here:
- Type a word related name of package e.g: F5
- Search (button)
- Create Rule
To view the name of your package if you do not know the exact name of WUA
- Go to C:\Program Files\WindowsApps
- View your WUA apps ID
I hope the information is useful for your WDAC deployment. Then, until next time.
Reference:
- Manage packaged apps
- Use Audit Event to create WDAC Policy
- WDAC create packaged app rule
- Deploy WDAC Policy by GPO
- Merging WDAC Policies
- WDAC supplement policies
- Creating WDAC Policy by Wizard
- WDAC and Applocker overview
- Device Guard Signing Service v.2
- WDAC Rule Options
- Using Aaron Script to deploy WDAC Policy -Video
- Device Guard and Credential Guard hardware readiness tool
Disclaimer
- The sample scripts are not supported under any Microsoft standard support program or service. The sample scripts are provided AS IS without warranty of any kind. Microsoft further disclaims all implied warranties including, without limitation, any implied warranties of merchantability or of fitness for a particular purpose. The entire risk arising out of the use or performance of the sample scripts and documentation remains with you. In no event shall Microsoft, its authors, or anyone else involved in the creation, production, or delivery of the scripts be liable for any damages whatsoever (including, without limitation, damages for loss of business profits, business interruption, loss of business information, or other pecuniary loss) arising out of the use of or inability to use the sample scripts or documentation, even if Microsoft has been advised of the possibility of such damages.
Posted at https://sl.advdat.com/2UzHbJX


