Introduction
This blog provides step by step guide to move Highly Available (HA) File share for SAP Applications (S/4 HANA OR SAP NetWeaver ABAP/JAVA) in Windows environment from SOFS Cluster to Azure Files SMB (Premium). This solution is useful for existing SAP deployments in Azure and like to migrate to Azure Files SMB.
SOFS Cluster is an IaaS based deployment in which we need to deploy VMs and Azure Storage then configure SOFS Cluster for File Share. As with IaaS based solution, effort for maintenance could be a limiting factor.
Azure File SMB (Premium) is a PaaS based solution for HA File Share for SAP Application environment. It is available in LRS & ZRS type which can be chosen based on the deployment design for specific customer environments. Azure Backup can be used to backup the Azure Files SMB. For DR / cross region replication of Azure Files SMB, we can synchronize the data to another Azure Files SMB in DR region based on this link and point the DR SAP systems to the local(DR region) Azure Files SMB.
This blog can also be used for moving 'sapmnt' and 'trans' from any other File share solution to Azure Files SMB.
Note : Though SAP installation through SAP SWPM using Azure Files SMB(AFS) does not work properly as of July 2021, we did receive many questions from customers who wanted to move their existing SAP file shares from SMB shares on SOFS to SMB on Azure Premium Files. Therefore, we invested into the procedure described in this article. We are working with SAP and AFS development to make sure that SAP SWPM can work against SMB on AFS in the future as well.
Detailed Setup Process
Create Azure Files SMB (Premium)
- Create the Storage Account
- Choose performance tier as ‘Premium’.
- Account Type as ‘File Shares’
- Redundancy as ‘LRS’ or ‘ZRS’
- Access Tier as ‘Hot’
- In the Connectivity Method, choose ‘Private Endpoint’ and create private endpoint in the SAP application VNET.
- Once Storage account is created, create the File share ‘sapmnt’ with required size.
- Optionally, we can also create separate File share for ‘trans’ with required size.
Install and Configure Azure AD Connect
Azure File Share authenticates based on users in Azure AD. We need to synchronize SAP specific operating system users & groups in AD DS to Azure AD using Azure AD Connect. Users for SAP system like ‘<sid>adm’, ‘SAPService<SID>’ and Group ‘SAP_<SID>_GlobalAdmin’ needs to be replicated to Azure AD.
- Get help from Identity Management team to synchronize users.
- If Azure AD connect is not in use, then perform the following.
- Download the Azure AD Connect from the link
- Configure the Azure AD Connect to integrate AD DS and Azure AD.
Azure Files Configuration
- Enable AD DS authentication for Azure Files SMB
Register your storage account with AD DS and then set the required domain properties on the storage account. Refer the link for more details.
- Download and unzip the AzFilesHybrid Module.
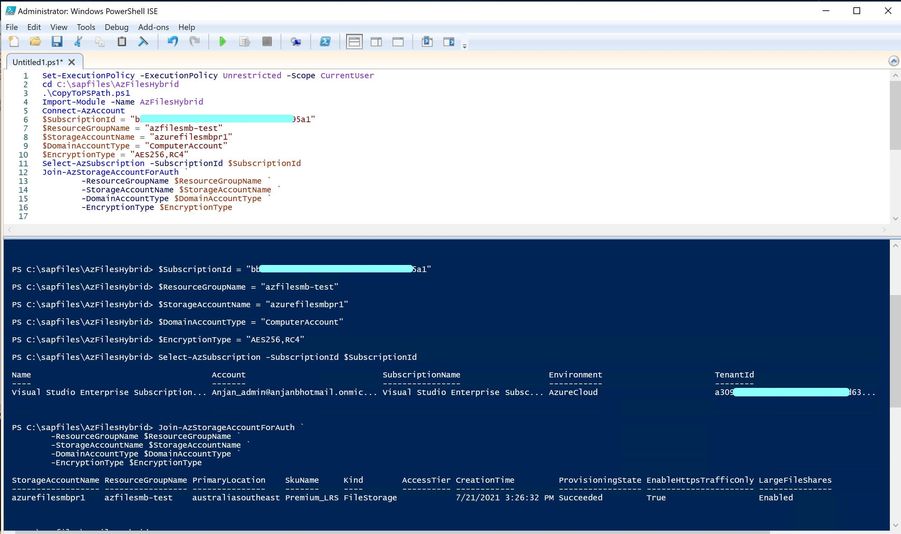
- Run the below Powershell Module to register Azure Files to AD DS. This needs to be run from the domain joined VM.
Set-ExecutionPolicy -ExecutionPolicy Unrestricted -Scope CurrentUser
cd <path of unzip location of AzFilesHybrid>
.\CopyToPSPath.ps1
Import-Module -Name AzFilesHybrid
Connect-AzAccount
$SubscriptionId = "<subscriptionId>"
$ResourceGroupName = "<resource group name of Azure Files>"
$StorageAccountName = "<storage account name>"
$DomainAccountType = "ComputerAccount"
$EncryptionType = "AES256,RC4"
Select-AzSubscription -SubscriptionId $SubscriptionId
Join-AzStorageAccountForAuth `
-ResourceGroupName $ResourceGroupName `
-StorageAccountName $StorageAccountName `
-DomainAccountType $DomainAccountType `
-EncryptionType $EncryptionType
- Verify that Storage account is registered with AD DS. Check the Fileshare Settings.
- Add the user, groups and RBAC Roles for the Azure Files SMB ‘sapmnt’ and/or ‘trans’ share.
Users : <sid>adm, SAPService<SID>
Group : SAP_<SID>_GlobalAdmin
RBAC Role : Storage File Data SMB Share Elevated Contributor
Roles for the users are assigned in the “Access Control(IAM)” of Fileshare.
- Verify the access is working from SAP VMs. It takes around an hour after adding RBAC roles before access starts working from VM.
Data Copy from SOFS to Azure File Share
- Copy the SAP Files & Folders from SOFS Fileshare to Azure Fileshare using the Robocopy tool.
- Login to ASCS/PAS VM as <sid>adm user and open the command prompt in admin mode.
- Go to(cd) directory where we would like to have the logfile of robocopy and execute the robocopy command.
robocopy \\sapglobal\sapmnt \\<Azurefiles_storageaccountname>.file.core.windows.net\sapmnt /e /mir /ia:RASHCNETO /mot:5 /mt:16 /z /v /log:robocopy_sapmnt.log
- Fileshare path names are for reference.
- This command can be run when SAP is up and it will synchronize source and target location continuously (every 5 minutes as per the parameter /mot:5).
- Once the data synchronization is done. Stop the SAP Instance (AAS, PAS & ASCS/ERS).
- Let last round of synchronization to happen and then stop the robocopy. Refer to the logs in the logfile mentioned in the command.
Update SAP Configuration with Azure File Share
- Update the environment parameters for <sid>adm user in all the SAP Application VMs.
- Update the profile parameter in DEFAULT.PFL, ASCS, ERS & APP Instance Profiles which is copied to the Azure Files.
SAPGLOBALHOST = azfilessmbpr1.file.core.windows.net
In Addition, add the below parameter in the DEFAULT.PFL. Value of the parameter should be same as in parameter SAPGLOBALHOST.
SAPGLOBALHOSTFULL = < Azurefiles_storageaccountname >.file.core.windows.net
- In NW 7.5 based systems, Update the local ERS Profiles in both the ASCS/ERS nodes in the path < Installation Drive>:\usr\sap\<SID>\ERS<##>\profile
SAPGLOBALHOST = < Azurefiles_storageaccountname >.file.core.windows.net
- Update the registry entries to change the path in SAP Service in all the SAP Application VMs.
- Stop SOFS Files share VMs as they are no longer in use.
- Rename the symbolic links for ASCS Node1 & Node2
Login as <sid>adm and Open command prompt as administrator
cd C:\usr\sap\PR1\ASCS00
mklink /d data \\azfilessmbpr1.file.core.windows.net\sapmnt\PR1\ASCS00\data
Repeat the steps for changing ‘log’ and ‘sec’ symbolic links.
cd C:\usr\sap\PR1
mklink /d SYS \\azfilessmbpr1.file.core.windows.net\sapmnt\PR1\SYS
Note : Rename the existing symbolic links before creating new links.
- Restart the SAP Application VMs for changes to be effective.
- Start SAP Application (ASCS, PAS, AAS).
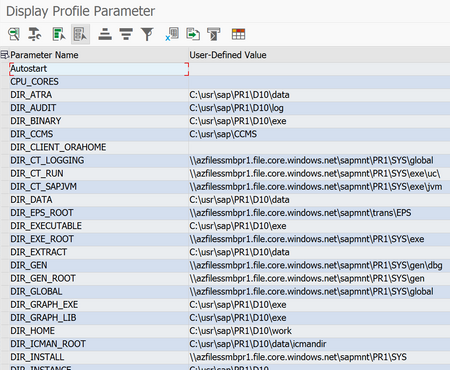
- Verify the Path in RSPARAM Program output to check the ‘sapmnt’ and ‘trans’ new location.
References
- SMB file shares in Azure Files | Microsoft Docs
- Overview - Azure Files identity-based authorization | Microsoft Docs
- Create an Azure file share - Azure Files | Microsoft Docs
- Enable AD DS authentication to Azure file shares | Microsoft Docs
- Synchronize files OR Transfer data to or from Azure Files | Microsoft Docs
- About Azure file share backup - Azure Backup | Microsoft Docs
- Azure AD Connect: Select your installation type | Microsoft Docs


