In this article, we will be exploring the below concepts,
- Understand QuickBooks Online APIs
- Trying QuickBooks API from the postman
- Create MS flow custom connectors.
- Integrating QuickBooks API from Power automate(MS flow) using Custom connectors.
Suppose you have some business process working in SharePoint/Power automate where employees are filling timesheets and after approval, you want to generate invoices in Quick books online (QBO). Or you want to record expense(bill) in QBO once your vendor has submitted his invoice due to you, maybe via power apps forms or SharePoint online list. Office 365 products like SharePoint, Power Automate, Power apps will allow us to automate a business process like approval, review, etc. And once this process is completed, we wanted to do accounting entries in our accounting software (in this case Quick books online).
So Let’s get started.
What do you need?
- Quick book online account.
- Intuit developer account.
- Postman
- Power automate (MS flow) license.
Quick book online account
Create a Quickbook online account (if not already) by subscribing to the plan as per your requirement. For this sample, I have created a 30 days trial account. You can check different pricing available at this link, based on your country different pricing and subscription are available.
Intuit developer account
You would need to create Intuit (company owning Quickbook) developer account.
- Go here
On the top menu, follow the last link to sign up. The below screen will open, fill in the below details.
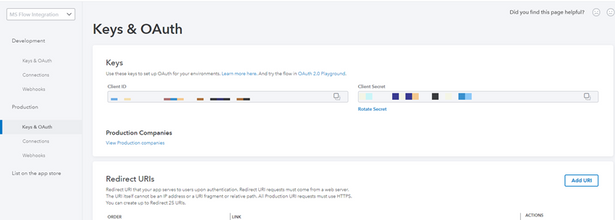
- Once sign in, you can follow this link to create an APP. Ignore Steps 3 and 4 for now from this link. Make note of client id and client secret, Please note that your sandbox client id and client secret will be different. For this demo, we will create production keys so that we can make the actual calls to our live environment.
- Below is how my developer dashboard looks like,
So we have all the things required from the QBO side of integration, let's move ahead.
Assuming now you already have Postman and MS flow license, let us go ahead and see the overall approach we will follow for this integration.
- Import postman collection,
- Create a new collection and copy/try the API calls from postman for required endpoints (web service we want to integrate)
- Setup authorization in postman to get access token.
- Call a simple web service.
- Export the collection.
- Create custom connector in Powerautomate
- Create Power automate(flow) and use actions to call Quickbooks API
Step 1
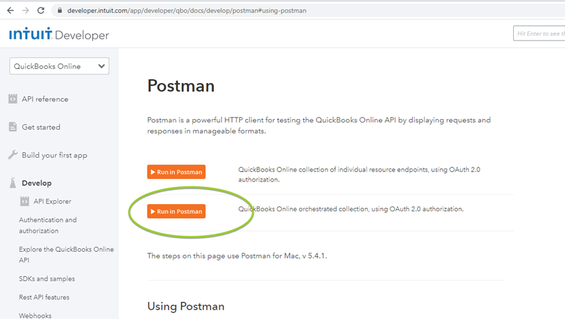
Import Postman collection of All APIs available in Quick book online. This export of collections is provided by Quickbooks at this link(refer to screenshot below).
This will directly ask to open postman and it will open collection like in the below screenshot.
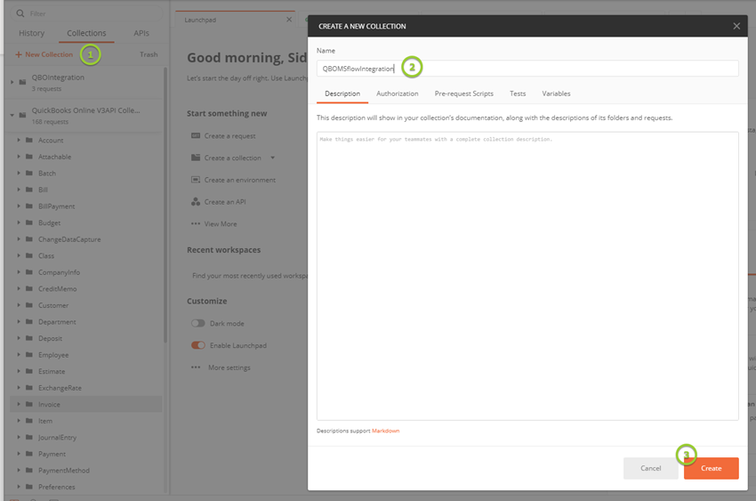
Step 2 - Create a new empty collection
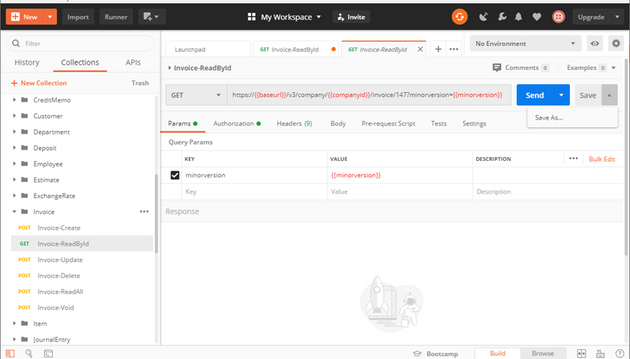
Now go to Imported postman collection and expand the Invoice.
We will use 2 API(invoice read by Id and create an invoice). Open one by one and click on Save as to save in our custom-created collection(QBOMSflowIntegration).
Please follow the same step for API ‘Create Invoice’.
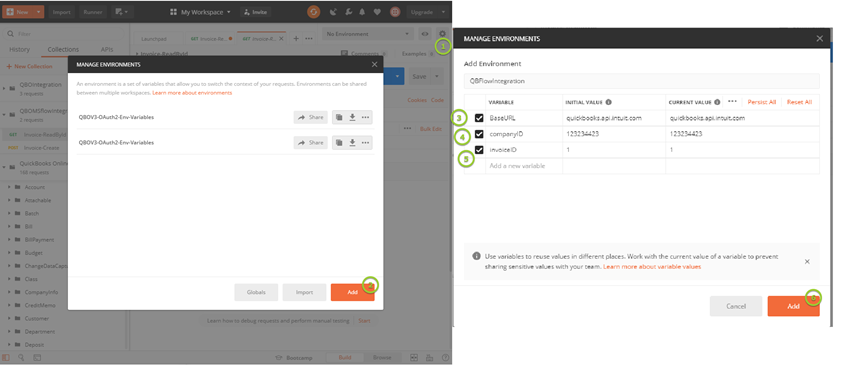
Now, Let set up an environment variable for dynamic values to be passed in URL.
Follow the below screenshot,
Create 3 URLs,
Base URL
Sandbox Base URL - sandbox-quickbooks.api.intuit.com
Product Base URL - quickbooks.api.intuit.com (Production)
Company ID – You can find company ID by following this link
Invoice Id – Set is 1(we will query invoiced Id 1 in one Get Invoice Webservice)
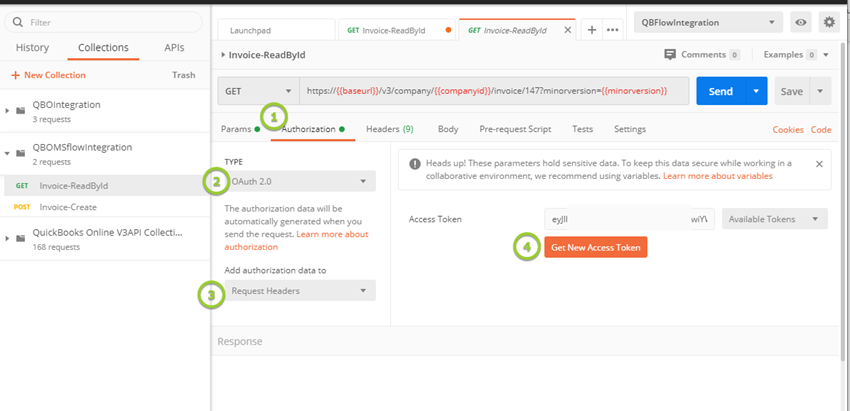
Step 3 – Setup authorization
Now let us set up authorization details to get the access token and pass it to the actual API call.
Please follow along with the below screenshot.
It should open the below popup box, enter the below details here.
- Token Name - Enter your preferred name
- Grant Type – Select Authorization Code
- Call Back URL - https://app.getpostman.com/oauth2/callback (this URL should be in Allowed redirect URL in Intuit developer dashboard, we will see how to do this later)
- Auth URL - https://appcenter.intuit.com/connect/oauth2
- Access Token URL - https://oauth.platform.intuit.com/oauth2/v1/tokens/bearer
- Client ID – This needs to be copied from intuit developer dashboard(use according to the environment)
- Client Secret - This needs to be copied from intuit developer dashboard(use according to the environment)
- Scope - com.intuit.quickbooks.accounting OpenID email profile
- State – mydemostateobject123213(this can be anything)
Client Authentication – Select. Send client credentials in the body.
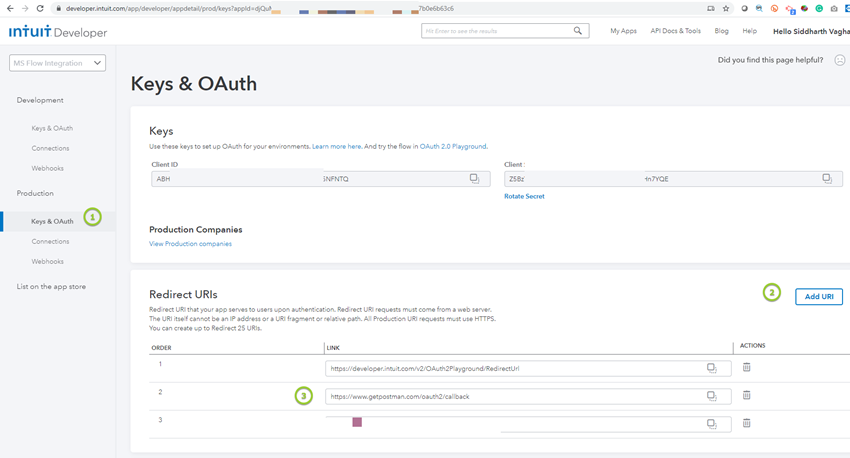
Before clicking on Request Token, we need to add a call-back URL to in developer dashboard.
Login to the developer dashboard at this link.
Click on My Apps, select targeted app, and refer to the below screenshot to add.
Once this is done, come back to Postman and Click on Request token, it will ask you to authenticate with your Quickbook account, login with a valid account, and follow along. Once you are logged in you should see the below popup, rename the token name with your preference and click on use token.
Select that token name in the available tokens dropdown.
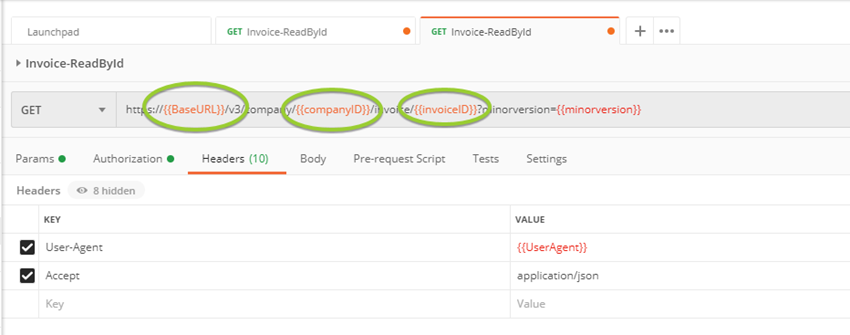
Now make sure, you match the environment variable name in the URL and what we used while created in the above step.
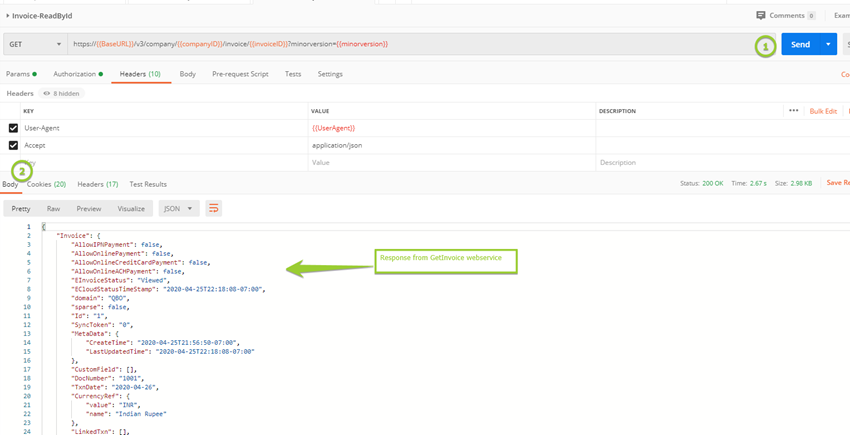
Step 4 – Call a simple web service
Now we are ready to test, click on the send button. If everything is set up correctly, we can see the below output.
In the same way, you can test Create invoice method. Make sure in the authorization tab you have selected the newly generated token. Follow the below screenshot, if you notice, there is already a JSON object in the body which is the bare minimum thing required to create an invoice. Click on send.
In your real case, you would have to pass many more things, for that you can always refer to Quick Book API documentation at this link.
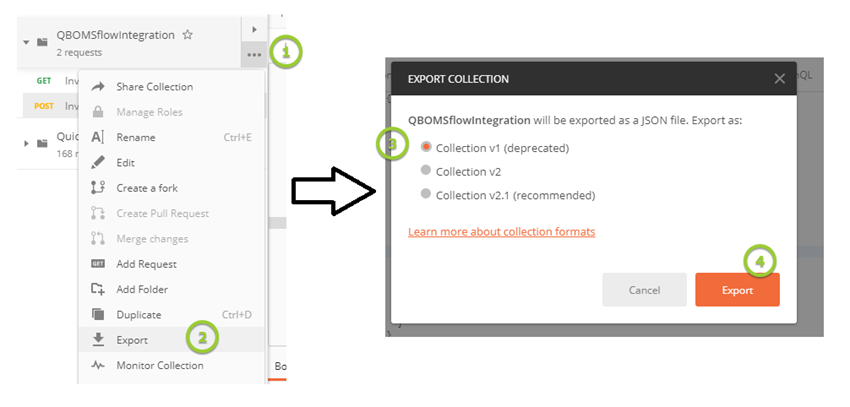
Step 5 – Export collection
Now we are done with the postman and it's time to export this collection, which will be used in Power automate to create the custom connector.
Once you click one export, it will ask you to save the exported file, save it at your preferred location.
Step 6 – Create a custom connector
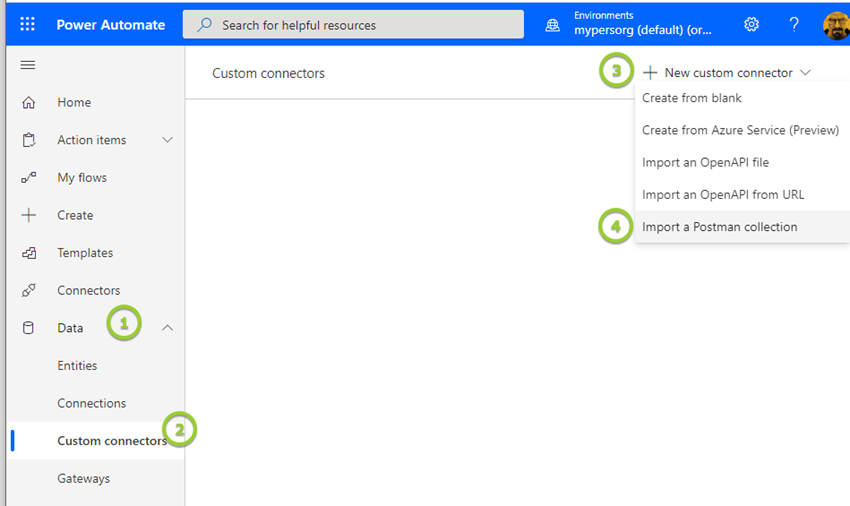
Now it's time to go to Power automate and create a custom connector.
Go here.
Follow the below screenshot,
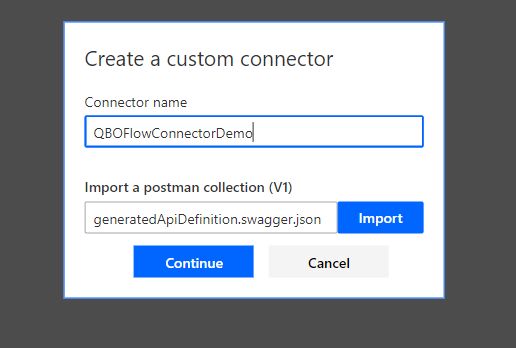
It will open below popup, select the JSON file which was imported in step 5. Give your preferred name. Click on Continue.
We will now be taken into a wizard where we have to setup our connector, In first (below screenshot) enter details are per your preference, we will keep default but enter the base URL.
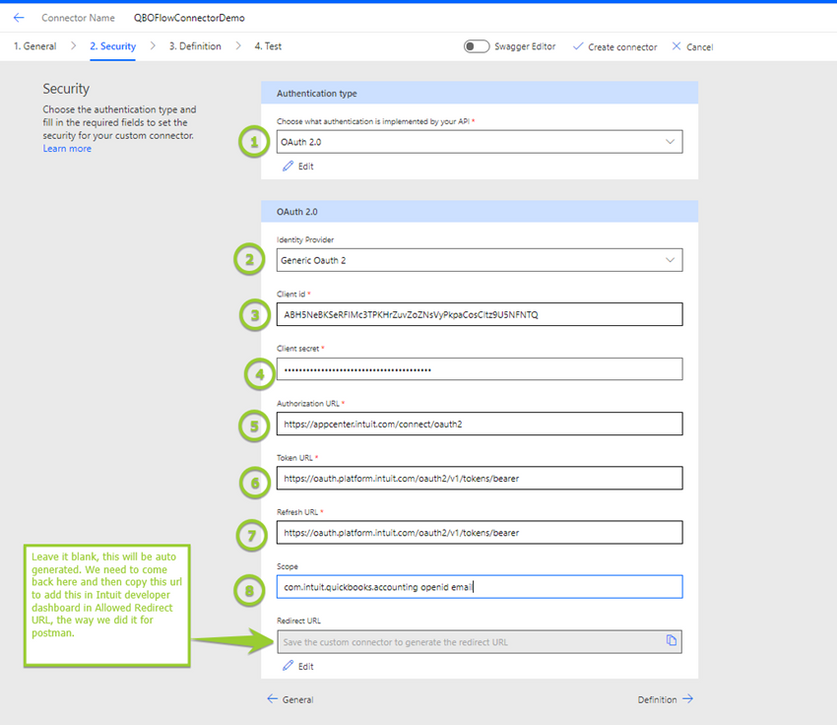
Click on Security Tab and select oAuth 2.0 in Authentication Type.
Below is for your quick reference, most of them are the same as we did in postman in Step 3.
- Identity Provider - Generic OAuth 2
- Client ID – Our App Client ID
- Client Secret – Our App Client Secret
- Authorization URL- https://appcenter.intuit.com/connect/oauth2
- Token URL - https://oauth.platform.intuit.com/oauth2/v1/tokens/bearer
- Refresh URL - https://oauth.platform.intuit.com/oauth2/v1/tokens/bearer (Same as Token URL)
- Scope - com.intuit.quickbooks.accounting
- Redirect URL – Leave it blank.
Note - Leave Redirect URL blank, for now, this will be auto-generated. We need to come back here and then copy this URL to add this in Intuit developer dashboard in Allowed Redirect URL, the way we did it for the postman.
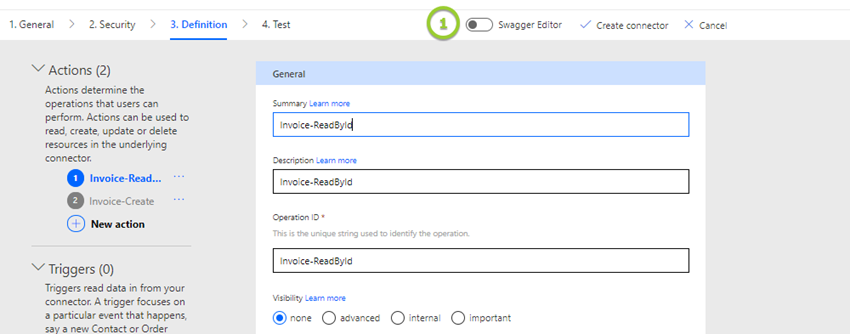
Click on Definition –Here we will see below screen,
Now comes the tricky part, By default the definition we imported using the swagger file does not understand the dynamic variables like BaseURL, CompanyId, and InvoiceId. This is because the syntax of the postman to pass dynamic variable is different than the swagger for Flow. So what we will do here is modify the swagger file manually so that we can pass company id, base URL, and Invoice id dynamically while configuring action in actual Flow implementation. Please note this is to demonstrate how to make your URLs dynamic (because in real use cases, we won’t call webservice via hardcoded data).
Enable Swagger Editor(as in the above screenshot)
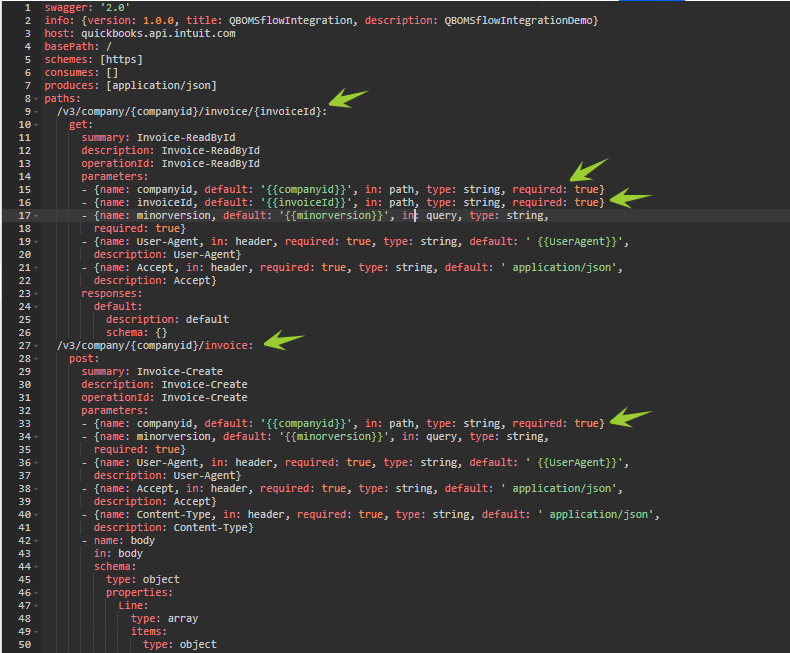
We will need to change the path both webservice url and add parameters definition
For Get Invoice parameters we added
- {name: companyid, default: '{{companyid}}', in: path, type: string, required: true}
- {name: invoiceId, default: '{{invoiceId}}', in: path, type: string, required: true}
For Create Invoice parameters we added.
- {name: companyid, default: '{{companyid}}', in: path, type: string, required: true}
This is how it will look after the change.
Please make sure there is no error while making this change, space is very important, for e.g if you missed a space as in the below screenshot it will give you a parser error.
Below is have it will look like if you made all entries correct.
You can Toggle Enable Swagger and click on create connector button.
It will validate and save your connector.
Now before moving forward, let us go back to the security tab and copy the redirect URL. Go to Intuit developer dashboard and add this in the Allowed redirect URL(as we did for postman).
In most cases, it would be below,
https://global.consent.azure-apim.net/redirect
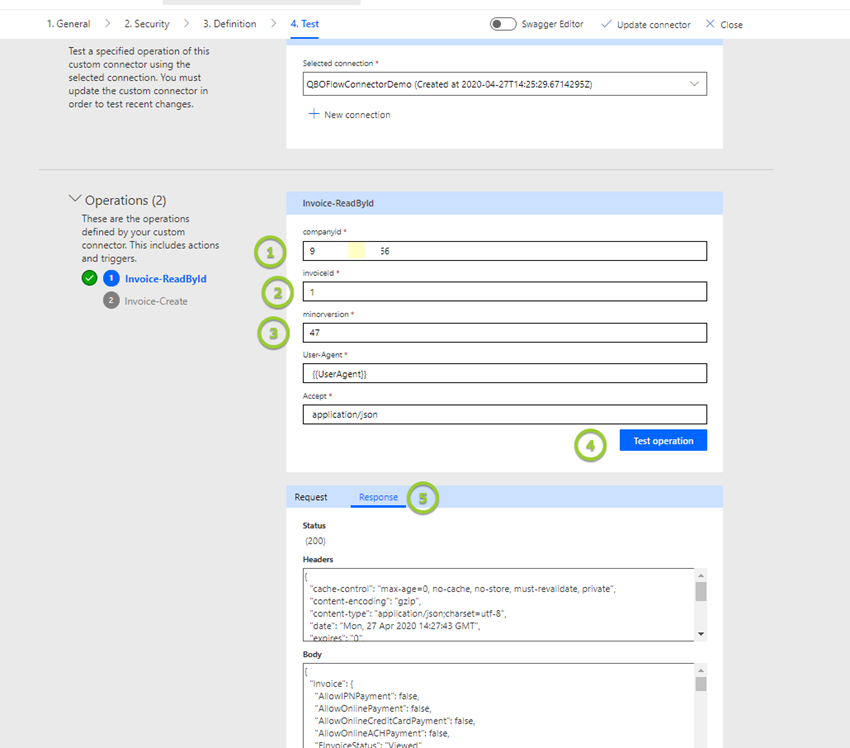
Now let’s test. Click on the Test tab, Click on New connection. It will ask us to login to Quickbooks, follow all steps as required. Enter companyid, invoice id as in below screenshot and click on Test operation, If you got output as marked as no.5, we are good. :smiling_face_with_smiling_eyes:
Congratulation our custom connector is created successfully, now it's time to create a sample flow to use this connector and its methods. For sake of simplicity, I am creating a flow with Manual Trigger.
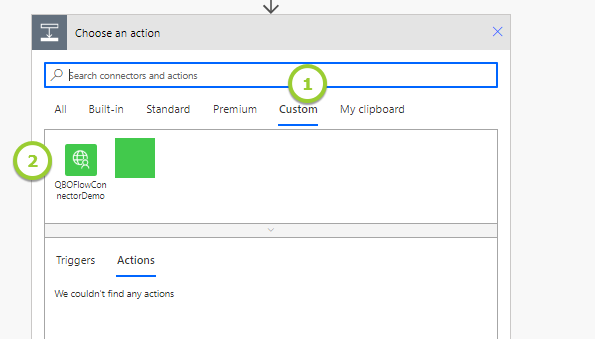
Now add a new step, in action, select the custom tab, select our custom connector,
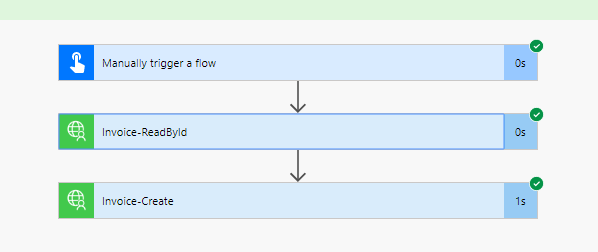
It will ask us to choose from 2 actions, first, add the Get invoice. Repeat this step and add Create Invoice also as the next step.
Configure both actions as in below,
Please note that for Create invoice, we need to pass Line as an array of the JSON objects. Copy it from the postman, below is for quick reference.
Value is customer Id on whose account we need to generate Invoice, so adding 1 here, make sure you have customer created with that Id.
We are done with setting up our actions, let us run it. Save flow,
Click on Test,
Select I’ll perform the trigger action. Click on Save and test.
Click continue -> Run Flow. Wait for some time. If everything goes well, you see the below message.
You can expand actions and check responses returned in both actions.
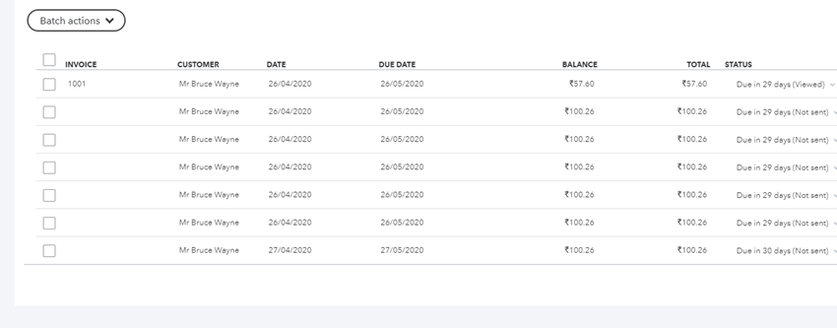
Login to Quick book, From left navigation Go to Sales->Invoices and you will see a new invoice generated. In my case, below are some generated invoices that I created from flow(except the first one) while testing flow.
So that’s come to end to the long article. To conclude, Please note we can create any operations available in quick books API from flow, we have to use first use postman to add the required API endpoint and then configure while creating custom connectors. Hope this helps and gives you a basic idea on getting started.
Posted at https://sl.advdat.com/3lLUUJb
