Introduction
As security continues to be at the forefront of technology implementations, customers are looking for guidance to secure client interaction with the cloud. One such approach is to use mutual authentication (mTLS) to authenticate not just the server, as is conventional, but also the client so that the server can be assured of whom it is interacting with. Azure Application Gateway V2 presently offers a public preview of mutual authentication.
A recent use case involved a customer with its own Public Key Infrastructure (PKI) desiring to secure communications with numerous clients that presented certificates issued by the customer's PKI. Given the large quantity of certificates, it was prohibitive to manage the client certificates individually in App Gateway. However, the customer set up its own Certificate Authority in this PKI and issued all of their own certificates that were to be checked in App Gateway. This provided a technical opportunity as we did not need to add each individual client certificate but could add the customer's issuing certificate instead. Had the customer used client certificates issued by a public PKI, any certificate issued by that certificate chain, not just the customer's certificates, would have been acceptable, which would have introduced a security issue.
Preparing the Certificates
For this tutorial you will need a client certificate as well as all of its issuing certificates up to and including the root. You will also need the client certificate's private key. By using the client certificate and the corresponding private key to sign the TLS messages, App Gateway is able to establish authenticated trust with the caller as App Gateway uses the caller's public certificate to authenticate the message signed with the caller's private key. Note that the private key never leaves the caller; it is only used to sign the messages prior to transmission to App Gateway. You must always exercise great caution in protecting your private key.
To gain experience with mTLS in a non-production environment, you can also use self-signed certificates here. Please be aware of the security ramifications involved with self-signed certificates, especially outside testbeds.
The certificates used in this article were generated through the creation of a private Certificate Authority (CA) that issued a client certificate.
In addition to the client certificate, you will also need a certificate for the Application Gateway. In this tutorial we will be using a self-signed certificate. Run the following PowerShell as an administrator to ensure rights to your local cert storage:
$cert = New-SelfSignedCertificate -CertStoreLocation Cert:\localmachine\my -dnsname www.contoso.com
$password = ConvertTo-SecureString -String "Azure123456!" -Force -AsPlainText

Get-ChildItem -Path ("Cert:\LocalMachine\my\" + $cert.Thumbprint) | Export-PfxCertificate -FilePath appgwcert.pfx -Password $password
Creating the Application Gateway
There are several ways to create an App Gateway. This tutorial uses the Azure Portal. We will be using x.com as it provides a simple return value in its response. To keep it simple on the backend and keep focus largely on frontend security, we will be making an HTTP, not an HTTPS request.
- Create an Azure Application Gateway v2 if you do not already have one.
- Enter the following on the Basics tab, then press Next: Frontends
- Resource group: rg-ag
- Application gateway name: ag
- Region: <any region>
- Tier: Standard V2
- Enable autoscaling: No
- Instance count: 1
- We recommend an instance count of at least 2 for production but in order to save money for this experimental setup, select 1.
- Availability zone: None
- HTTP2: Disabled
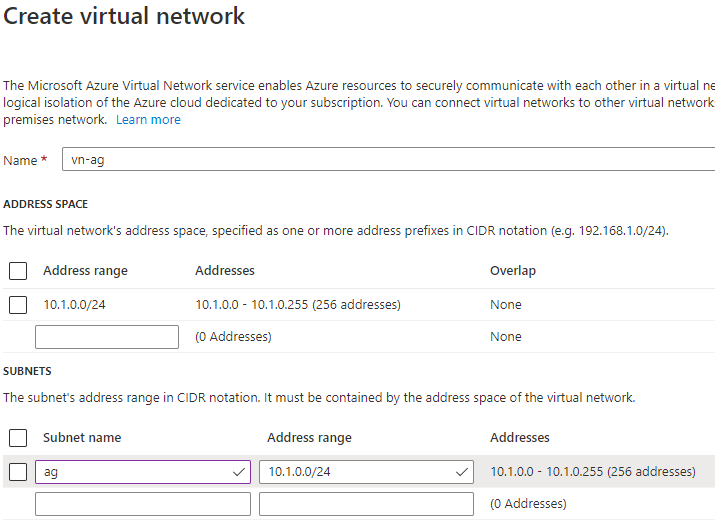
- Create a new Virtual Network:
- Name: vn-ag
- Address space - Address range: 10.1.0.0/24
- Subnets: Name: ag | Address range: 10.1.0.0/24
- Enter the following on the Frontends tab, then press Next: Backends.
- Frontend IP address type: Public
- Public IP address: Add new
- Name: ag
- Press Add a backend pool on the Backends tab, enter the following, press Add, then press Next: Configuration:
- Name: x
- Target type: IP address or FQDN
- Target: x.com
- Enter the following on the Configuration tab:
- Press Add a routing rule
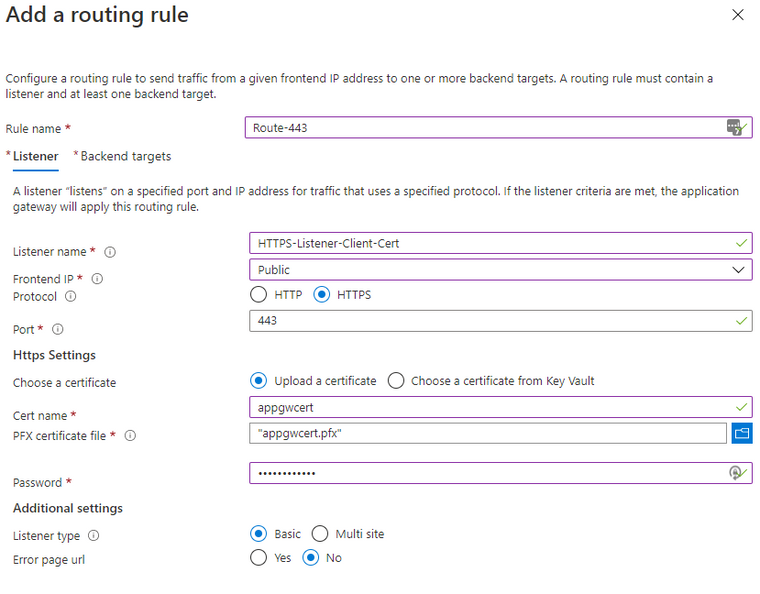
- On the Listener tab, enter the following:
- Rule name: Route-443
- Listener name: HTTPS-Listener-Client-Cert
- Frontend IP: Public
- Protocol: HTTPS
- Port: 443
- Choose a certificate: Upload a certificate
- Cert name: appgwcert
- PFX certificate file: <browse to the App Gateway certificate you created earlier>
- Password: Azure123456!
- On the Backend targets tab, enter the following, then press Add, followed by Next: Tags:
- Target type: Backend pool
- Backend target: x
- HTTP settings: Add new
- HTTP settings name: HTTP
- Backend protocol: HTTP
- Backend port: 80
- Override with new host name: Yes
- Host name override: Override with specific domain name -> x.com
- Create custom probes: No
- On the Tags tab press Next: Review + create.
- Press Create.
Setting up the Application Gateway
- In the Azure Portal navigate to your Application Gateway v2.
- Open SSL Settings in the resource menu. You may still see it labeled (Preview).
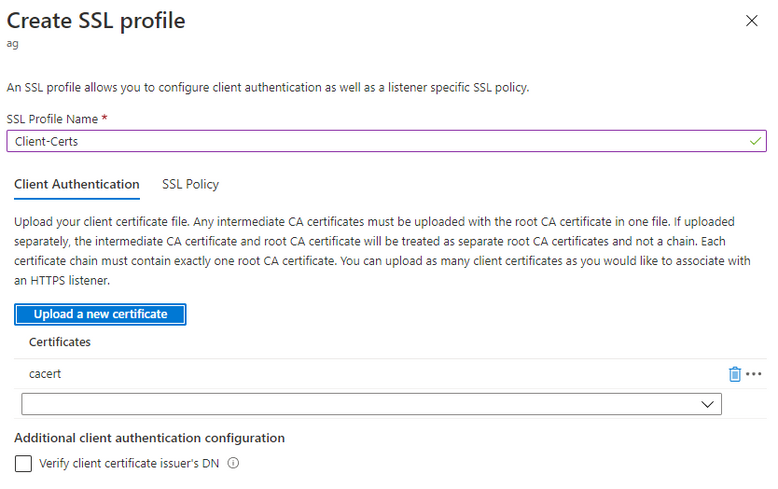
- Press + SSL Profiles to create a new SSL profile and enter the following:
- SSL Profile Name: Client-Certs
- On the Client Authentication tab press Upload a new certificate and browse to the certificate file that contains the CA/intermediate trust chain except for the client certificate (i.e. just intermediate and root certificate in this file)
- You should now see the certificate file in the dropdown. Press Add to finish creation of the SSL profile.
- The newly-created SSL profile should be listed now.
- Switch to Listeners in the resource menu.
- Click on the HTTPS-Listener-Client-Cert listener.
- Check Enable SSL Profile and select Client-Certs.
- Press Save.
At this time the Application Gateway is properly configured to accept secure traffic with your client certificate.
Note that the default TLS version in Application Gateway is set to TLS 1.0. We recommend using at least 1.2 going forward, but setting this is beyond the scope of this tutorial.
Testing secure communication
You can easily test secure traffic with a simple NodeJS script. In my example, cert, fabrikam.pem, is the client certificate that was signed by the self-signed root certificate I uploaded to Application Gateway, cacert.pem. The corresponding private key to sign the TLS messages with the Application Gateway is fabrikam-key.pem. Again, this key never leaves your computer; it is only used for signing messages. The host IP is my Application Gateway's public IP, obtained from the App Gateway Overview section in the Azure Portal, port is the standard HTTPS port we used in the listener. As I am working with a self-signed certificate, I also set rejectUnauthorized to false.
const https = require('https');
const fs = require('fs');

https.get({
    cert: fs.readFileSync('./clientCerts/fabrikam.pem'),
    key: fs.readFileSync('./clientCerts/private/fabrikam-key.pem'),
    host: "20.85.219.45",
    port: 443,
    rejectUnauthorized: false       // suppress "Error: self signed certificate" / DEPTH_ZERO_SELF_SIGNED_CERT
}, res => {
    let str = '';
    res.on('data', (data) => str += data);
    res.on('end', () => console.log(str));
});
Executing node test.js yields proper authentication with the Application Gateway and a return from x.com:
You can easily verify that traffic is restricted to certificates issued by the cert you configured in the SSL listener. Simply either replace that certificate in App Gateway or use a different private key and client certificate not issued by the certificate presently set up in App Gateway.
Revocation of Client Certificates
While we can already verify a certificate trust chain and authenticate the caller, the preview does not yet offer certificate revocation checks via Online Certificate Status Protocol (OCSP). This feature is forthcoming still to round out the mutual authentication experience.
Conclusion
Utilizing mutual authentication between clients and servers is a powerful security feature that Application Gateway V2 provides and is just one component in a well-designed defense-in-depth approach.
Posted at https://sl.advdat.com/3FfqFBh


