API Management is a proxy which help to forward the request from client side to destination API service. It has the ability to modify the request or process based on the inputs from the client side before it reaches the destination.
On the other hand, WebSocket APIs are used to build real-time applications such as stock market reports, live sports scores, real-time social feeds.
With native support for WebSocket APIs in Azure API Management, you can manage, protect, observe, and expose your WebSocket APIs, alongside REST and SOAP APIs.
With this capability, you can now:
- Manage both WebSocket and REST APIs with API Management.
- Quickly add a WebSocket API in API Management via a simple gesture in the Azure portal, or via the management API and Azure Resource Manager.
- Secure WebSocket APIs by applying existing access control policies (e.g., JWT validation).
- Test WebSocket APIs using the API test consoles in both Azure portal and developer portal.
- Get metrics and logs for monitoring and troubleshooting WebSocket APIs.
Note: This is available in all API Management pricing tiers (except Consumption).
WebSocket Protocol – Key Benefits over HTTP
- In WebSocket’s, client and server can exchange messages independently. In HTTP based communications such as REST, client must initiate communication with server and “poll” the server for a response, which is inefficient.
- A single persistent connection that removes the overhead of expensive SSL handshake and re-establishing connections and reduces latency.
Understand how Web Socket works in APIM:
- Client sends http(s) request to APIM to ask for establishing WebSocket connection
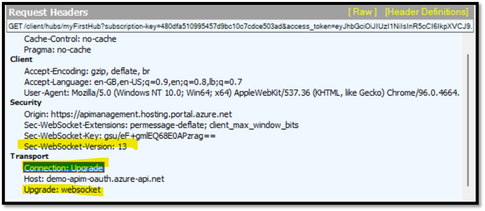
- The http request must include the following headers
- Connection: Upgrade
- Upgrade: Websocket
- Sec-WebSocket-Version: 13
- Once APIM receives WebSocket connection request from Client, APIM then executes defined policies. The connection request is then forwarded to the backend.
- Once Server agrees the connection request, it returned http response back to APIM with http status code 101. APIM then returns the response back to client.
- Once the WebSocket connection is established, client can send message in WebSocket protocol to backend server through APIM.
- The http request must include the following headers
Configure APIM with WebPubSub service:
- An existing API Management instance. Create one if you haven't already.
- A WebSocket API. (in this demo we will be using Azure Web PubSub Service: https://docs.microsoft.com/en-in/azure/azure-web-pubsub/overview)
Steps to create Azure Web PubSub :
- Create an Azure Web PubSub service instance following https://docs.microsoft.com/en-gb/azure/azure-web-pubsub/quickstart-live-demo#create-an-azure-web-pubsub-service-instance
- Once the Web PubSub service gets created, you would be observing the Client Access URL under the Key Blade as shown below:
- Please note that WebSocket endpoints are prefixed with WS:// (non-secure, port 80 by default) or WSS:// (secure, port 443 by default)
- We can use the Client Access URL to do some quick connect test using the built in tool from Web Sub.
Client Access URL : https://azure.github.io/azure-webpubsub/demos/clientpubsub.html
Steps to Add Websocket API in APIM:
- Navigate to the API Management service
- Go to APIs => Add API => WebSocket
- In the "Create a WebSocket API" dialog:
- WebSocket URL is in a form of wss://<your_webpubsub_name>.webpubsub.azure.com/client/hubs/<your_hub_name>
- Replace <your_webpubsub_name> with the name of your Web PubSub resource
- Replace <your_hub_name> with the name of the hub you use. For example if your Web PubSub resource is demo, and the hub name is chatdemo, the WebSocket URL should be "wss://demo.webpubsub.azure.com/client/hubs/chatdemo"
- Make sure to have the API URL suffix in the form of "client/hubs/<your_hub_name>" and replace "<your_hub_name>" with the name of your hub
- WebSocket URL is in a form of wss://<your_webpubsub_name>.webpubsub.azure.com/client/hubs/<your_hub_name>
- Test the API
- Use the Test tab, add "access_token" query parameter
- Go to the Web PubSub resource, go to the Keys tab, and use the Client URL Generator to generate the Client URL which contains a temp value for access_token
- Make sure the Hub name is the same name as the one set in APIM
- The "Client Access URL" will have a form of: wss://<your_svc_name>.webpubsub.azure.com/client/hubs/<your_hub_name>?access_token=<TokenToCopy>
- Copy the value of the access_token to the query parameter of the APIM and click Connect.
- Use the Test tab, add "access_token" query parameter
Note:
- When generating url (e.g. via serviceClient.GenerateClientAccessUri) make sure it contains both APIM key (in case it is used for auth) and the WPS access_token query string parameters:
wss://your_service_name.azure-api.net/client/hubs/your_hub_name?subscription-key=<apim_key>&access_token=<wps_key> - If you don't want to (or it is not feasible) to generate the access_token that APIM would just normally pass the to WebPubSub service, you could allow anonymous access and configure private VNET to limit access to WebPubSub from APIM only.
Common Scenario when client failed to establish Web Socket connection to APIM and to backend -
Scenario 1 : Invalid websocket upgrade request
- When we see the above error message, we will need to check the followings
- Connection Request must have the following three headers. We can use fiddler to capture request and confirm request header
- Connection: Upgrade
- Upgrade: Websocket
- Sec-WebSocket-Version: 13
- Connection Request must have the following three headers. We can use fiddler to capture request and confirm request header
- Request URL endpoint must exist APIM.
- For example, my websocket URL endpoint in APIM is wss://demo-apim-oauth.azure-api.net/wsapiwebscoketdemo, then the request URL that client sends cannot be wss://demo-apim-oauth.azure-api.net/wsapiwebscoketdemo/{extraParam}
Reference : https://docs.microsoft.com/en-us/azure/api-management/websocket-api
Happy Learning! :)
Posted at https://sl.advdat.com/334fA81


