If you’re in charge of creating or maintaining the infrastructure or security of a large and complex Azure network environment, comprised of many virtual networks (VNets), Network Security Groups (NSGs), and virtual machines (VMs) spread across several Azure regions and subscriptions, some of these questions could sound familiar to you:
- How do I enforce a central standard, while letting other teams have autonomy? As the administrator for Azure networking, if I manage the NSGs, I need to help the product teams modify their NSGs every time, which is an operational burden. On the other hand, if I give them freedom, they can open everything and undo the changes I make.
- How can I ensure all the new VMs coming up are automatically protected from inbound SSH or RDP traffic when provisioned (even if Azure Policy isn’t enforcing an NSG to be applied)?
- How can I protect my VMs and VNets at scale when we identify new high-risk traffic? Do I really have to configure NSGs one by one to block this traffic?
- Is there a way in which I can automatically apply my security configurations to all VNets, including both existing and newly created VNets in the future?
- How can I easily create a full mesh topology between my VNets? Do I really have to create both sides of the network peering for each pair of VNets manually?
These questions are common to larger enterprises and reflect common use cases we see from customers.
Well, have no fear! There’s a new kid in town, designed to solve all these use cases (and more) — Azure Virtual Network Manager (AVNM).
In this article, we will introduce Azure Virtual Network Manager at a high level, giving you an overview of its capabilities and show you where to go for more information.
What is Azure Virtual Network Manager?
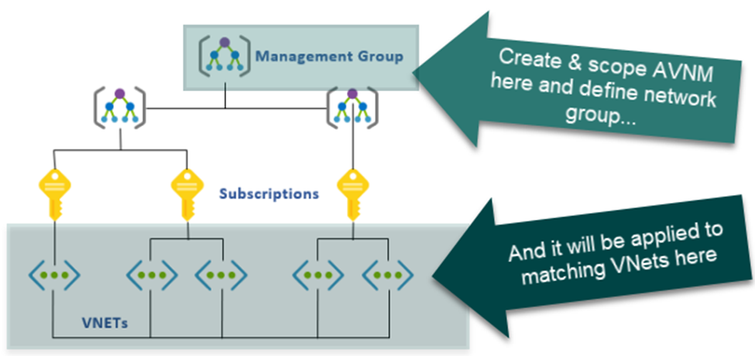
Azure Virtual Network Manager is a highly scalable and highly available network management solution that lets you manage virtual network connectivity and network security rules. Currently, AVNM supports connectivity and security admin configuration features. AVNM allows you to group, configure, deploy, and manage virtual networks at scale across your subscriptions and Azure regions. Network managers can be scoped at any level (or multiple! See below.) of your management group or subscription hierarchy as long as you have the network contributor role, and all child virtual networks “downstream” can be managed from a single pane of glass.
Below, if you select the scope for your AVNM to be only management group A, then the VNets under subscriptions D, E, and F (which are ultimately encapsulated within management group A) are all visible to that network manager.
Additionally, you can create multiple AVNMs – as long as two AVNMs do not have the exact same scope and feature combination, they can coexist and the configurations of these AVNMs will be overlayed. The reason why AVNM has this design is because this ensures that VNets would know which AVNM’s configuration would prevail when there is a conflict.
For example, referencing the diagram above, you can have one AVNM scoped to management group A for corporate-wide enforcement; and another AVNM scoped to management group C for business- or environment-specific security or connectivity purposes. These two AVNMs can be used by two different teams. When there is a conflict between the security admin configurations from different AVNMs, the configuration from the AVNM with a higher-level scope will prevail. We’ll cover more details on configurations later.
The logic illustrated in the three scenarios below is that these AVNMs cannot have the exact the same combination of the scope and feature.
The operative concept here is where the AVNM is “scoped”, the management group(s) and/or subscription(s) visible to AVNM control. In Example 4 below, a parent management group also has both a connection and security configuration applied. Since AVNM #1 and AVNM #2 do not have the exact the same combination of the scope and feature, you can create these two AVNMs. When there are conflicting security admin rules from AVNM #1 and AVNM #2, the security admin rules from AVNM #1 prevail over the conflicting rules of AVNM #2 because the scope of AVNM #1 is at a higher hierarchy level.
The Azure Virtual Network Managers are managed in their own section of the Azure Portal and are known as “Network Managers”:
As a new Azure product, AVNM has the standard bevy of features you’d expect, such as:
- Access Control through RBAC (using Network Contributor role as a minimum)
- Managed through the Azure Portal, PowerShell, CLI, REST API, .Net/Python SDK
- Manage VNets across regions and subscriptions
- Effect visibility through Network Watcher (IP flow verify and Effective security rules) and Virtual Network and VM blades
We’ll go through the bits in some detail, further on, but here’s the network manager creation GUI through the Azure Portal:
So, What Can AVNM Do?
At a high level, AVNM can create connectivity configurations and/or security admin configurations to control either network connectivity and/or network security.
- Connectivity configuration: this will create connections between Azure VNets in either hub and spoke or full mesh topologies. In the hub and spoke topology, you can also enable an option to allow spoke VNets to connect directly to each other without going through the hub VNet. In the example shown below, you can allow the “Prod” spoke VNets to connect to each other, while the “Test” VNets do not.
Security admin configuration: this will create security admin rules for controlling either inbound or outbound traffic. Security admin rules are evaluated prior to NSG rules as shown below, so you can use this security admin configuration to create and enforce organizational level rules.
A Closer Look
High-Level Architecture
Let’s take a closer look at how AVNM works. There are four main pieces of AVNM:
- Network manager: the container that manages the components. It defines the scope of its visibility and control, and the features you can manage.
- Network group: defines one or more VNets that will be governed by the network manager. This is a logical group of your network resources.
- Configuration: ties a connectivity configuration or a security admin configuration to one or more network groups.
- Deployment: rolls out a configuration to one or more Azure regions.
These components added together make the magic happen.
Let’s look at the last three of these in more detail.
Network Groups
While the network manager itself can be scoped at management groups and subscriptions, there needs to be an explicit definition of which of the VNets in that scope will be impacted. Like, are we talking all of your VNets? Only those for your test environment? Only those for a line of business? Those hosting servers with sensitive information? The ability to define multiple, very specific network groups allows for configurations to be applied very high up in the governance infrastructure yet be very granular on which VNets it impacts.
Network groups define which VNets in the network manager scope are going to be governed. This is a logical grouping, so you have complete control of network group membership by:
- Static membership: where you manually select the virtual networks to be included.
- Dynamic membership: where you define rules that automatically assign VNets based on conditional statements for one or more of these elements:
- Name
- ID
- Tag name
- Subscription name
- Subscription Id
- Subscription tags
- Resource group name
- Resource group Id
- Resource group tags
For example, a network group with dynamic membership can include all VNets starting with the word “Prod” in their name, or any VNet belonging to a particular line of business’ resource group. Multiple criteria can be added together to get very fine control of which VNets are included in the network group. You can also create your dynamic membership definition using JSON syntax. See here for details.
After you deploy the configurations applied to a network group, any new VNets that match the defined dynamic criteria get added to that network group and those VNets that change and no longer match the dynamic membership criteria get removed from the network group. However, for static membership, you need to make any changes to the membership manually and deploy the configurations applied to that network group again. In summary, when your definition of the network group changes, you need to deploy the configurations applied to it again to take effect. In the case of dynamic membership, if the definition of the membership doesn’t change (i.e. you don’t change the conditional statements), you don’t need to re-deploy the configuration, and AVNM will automatically take care of the membership changes.
As mentioned earlier, a network manager can be scoped to management groups subscriptions. When an AVNM is scoped to a management group, it means all child management groups and child subscriptions are in that AVNM’s scope. Once the scope is defined, Azure’s governance mechanism will apply it “downstream” to include any VNet in that scope. Defining a network group inside of a network manager defines “which” VNets to include (whether statically or dynamically, or both). Since multiple configurations from different AVNMs can be applied simultaneously, if there are conflicts, the configurations from the AVNMs with the higher-scoped level (from the Azure governance perspective) take precedence. So, the higher up in the management group/subscription hierarchy the network manager is scoped, the more priority it has.
In the graphic below, we see a simple management group structure, with two child management groups, and three subscriptions distributed under those, containing a combined total of five VNets.
Let’s look at some of the interactions you can perform:
Enterprise-wide deployment: a network manager can be created and scoped to the top management group level and it will apply to all VNets that match the definition for the network group. It’s worth emphasizing that a network manager can be scoped to management groups and subscriptions, but only the VNets matched to the network group(s) definitions will be governed. The scoping basically bubbles up the potential VNets that could be managed under the network manager through configurations, assuming they are in a network group.
For example, an AVNM created and scoped at the highest management group will have all VNets in the entire enterprise as potential candidates. However, in this example, since a network group in the AVNM has a dynamic membership definition that limits the VNets to those with “Test” in the name, only those across the enterprise that match are actually subject to the AVNM configurations.
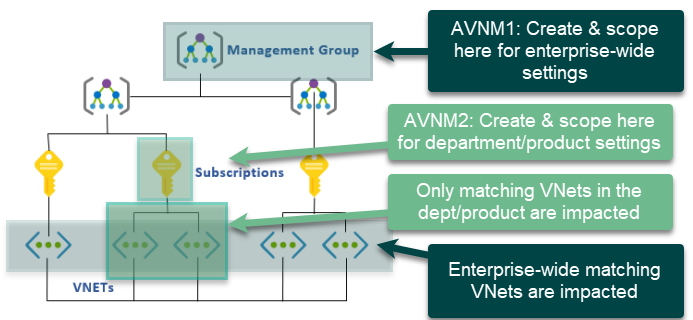
To take things a step further, as mentioned above, multiple AVNMs could be created by two teams, with one created for the enterprise-wide scope, and another scoped for a specific line of business or other purpose. As a simple example, you could create two network managers: one with the scope of the top-level management group to be used by the central governance team and would have the ability to apply configurations enterprise-wide (AVNM1 in the image below). Another one could be scoped to a subordinate management group or subscription, and would be used by a product team wishing to apply product-specific security admin rules en masse (AVNM2 in the image below).
The result is a robust mechanism that lets you make complex security scenarios that have the minimum controls deployed enterprise-wide by a central team and allow subordinate lines of business, projects, or other entities able to add their own configurations via separate network managers.
Configurations
AVNM can manage the connectivity and security of VNets. It does this by means of configurations. A configuration can be of either connectivity or security admin type, and an AVNM can contain both types of configurations. When you first create your network manager, you can select what types of configurations that you want the network manager to be capable of in the “Features” selection. Note that you cannot modify the features of that network manager once you’ve created it.
Connectivity Configuration
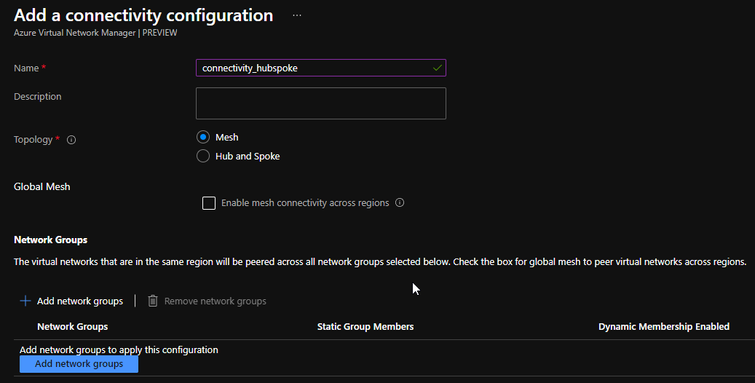
A connectivity configuration is a simple construct that defines the type of network topology to be configured on your VNets, and the network groups on which to apply it.
Let’s look in more detail at the two variants:
- Mesh: as expected, this option connects all VNets in the selected network group(s) to one another. There is one option here:
- Enable mesh connectivity across regions. If not selected, connectivity between the VNets in the network group will only be created between VNets within their own single respective Azure region. For example, East US VNets could connect to other East US VNets, Japan East VNets could connect to other Japan East VNets, but East US VNets could not connect to Japan East VNets. Select this option to allow VNets from different regions to connect to one another. In the effective routes, you will see a connected group created for the mesh. See here for more information.
- Hub and Spoke: in this topology, you choose a VNet which is not included in a network group to serve as the hub, as well as the network groups of the VNets you’re looking to use as spokes to the hub. There are a few more settings to decide on as well:
- Delete existing peerings. This allows you to do a clean-slate wipe and re-create the network peerings through this configuration.
- Use hub as a gateway. This is the typical network peering setting for gateway transit. Setting it to use the hub as a gateway enables routing between each spoke. Note that if you enable this option while you don’t have a gateway in the hub, the attempt to create the connectivity between the hub and spokes would fail.
- Direct Connectivity. This selects whether to create connectivity between each VNet in the spoke network group(s).
- Global Mesh. If not selected, direct connectivity will only be created for the VNets in the spoke network group(s) within regions.
Note that the direct connectivity created between spoke VNets would be displayed as “ConnectedGroup” in your effective routes. The connections between the hub and the spokes would be peerings. See here for more details.
Using these settings together, you can create a hub and spoke topology where some VNets can have direct connectivity within the network group, like “Prod” below, and some, like “Test”, only have connectivity to the hub from each spoke VNet. The colored area below shows the VNets that are part of a ConnectedGroup, which in this case are the Prod VNets, since direct connectivity was enabled for the Prod network group. All the Prod and Test VNets are connected to the hub VNet through peering.
Prior to the connectivity configuration of AVNM, your main option for connectivity between VNets was to manually peer them together. This involves setting the network peering relationship up on each side of the pair, and it quickly becomes an administrative burden as the number of VNets increased (for example, in the case of the mesh topology, 10 VNets would require 10*9/2=45 peerings; 500 VNets=124,750 peerings). It can be programmatically controlled, true, but as the number of VNets scales into the tens and hundreds, it can quickly become unmanageable, let alone if you need to alter the topology.
Using a connectivity configuration with dynamic network group membership can greatly reduce this burden and make it a simple matter to connect a multitude of VNets together.
Security Admin Configuration
Now let’s have a look at what AVNM does to control security. This is done using security admin configurations, which include network traffic rules grouped into rule collections that are then applied to one or more network groups.
These security admin rules get evaluated before NSGs get processed, so they have a higher priority than NSG rules. This allows an AVNM configuration to be defined at a corporate or business unit level to restrict or allow traffic, while still allowing subordinate teams to manage their own traffic through traditional NSGs, a separate AVNM scoped lower in the governance structure, or with lower priority rules. Note, security admin rules do not change NSGs. Instead, they are defined independently, and security admin rule won’t change NSGs.
These security admin rules are exactly what you’d expect from something like NSGs or a firewall—you select a priority, direction, action, source, and destination network parameters. However, in addition to Allow or Deny, there’s a third option to Always Allow. The traffic that meets the Always Allow rule would be allowed without getting evaluated by NSG rules or lower priority security admin rules. You can use Always Allow to force of the traffic to be allowed.
Why Security Admin Rules?
As a network administrator, you can use security admin rules to create high-priority rules that should be enforced across your organization and still allow individual product teams to control their own NSGs for flexibility. Without AVNM's security admin rule, it was not easy to enforce your organization's security rules while preserving product teams' agility in meeting their security needs. Often, you needed to allow all the NSGs to be managed by either the network administrator or the individual teams. The former case incurs significant operational overhead to the network administrator, and the latter lacks security enforcement. Using security admin rules, you can solve this issue.
Security admin configurations also allow you to protect your network environment at scale. Security admin configuration can be defined and applied to all in-scope VNets. It doesn’t matter if there is one, ten, a hundred, or a thousand or more NSGs – any new Azure resources created and connected to a VNet in a network group with a security admin configuration applied will be protected from day one.
Example Use Cases
Here are several AVNM use cases for security rules:
- Creating a set of corporate security rules that should be enforced by the organization as security admin rules. All VMs under the VNets covered by the security admin configurations would be applied with these rules. Even the new VMs created after the configuration deployment would be protected once the VMs are created, so you can ensure your environment is always protected by default.
- For example, a company wants to block inbound SSH on port 22 across the organization. Even if there is no NSG rule blocking port 22 attached to a VM’s NIC or VNet, or even if there’s an NSG rule allowing port 22, the AVNM security admin rule will “win” and that traffic will be blocked. This can eliminate human error if there’s no Azure Policy enforcing attachment of an NSG to a VNet or NIC.
- As a network security administrator, when you find a high-risk traffic pattern, you can use a security admin configuration to protect your targeted VNets at once without individually modifying a large number of NSGs.
- Blocking of prohibited IP addresses. Set a central list of IP addresses or ranges to which all traffic should be blocked. Any resource attached to a managed VNet will be prevented from reaching that list.
- We’ve seen customers use AVNM and some Azure automation features to automatically set AVNM security admin rules based on a text file containing the list of IPs to block when their central security group updates it. Their central security can modify the prohibited list and the IPs on the list get blocked when the text file is updated.
- Ensure that VNets containing management resources are always allowed.
Viewing AVNM Impact
Along with the introduction of the Azure Virtual Network Manager product itself, other areas of Azure have been enhanced to give you full visibility of the impact your network managers are having.
Integration with Network Watcher
Effective security rules
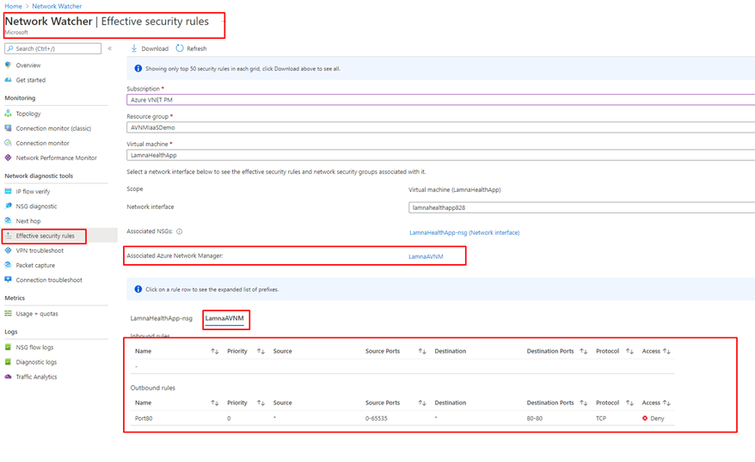
For starters, the Network Watcher blade has been enhanced. In addition to network security rules placed via NSGs, Network Watcher’s Effective security rules blade clearly shows the security admin rules associated with a network manager.
IP flow verify
The IP flow modelling available through Network Watcher’s IP flow verify blade has also been enhanced to factor in AVNM’s security admin rules. The name of the AVNM security admin rule is displayed in the results, like “Port80” in this example.
Integration with Network Interfaces and Virtual Machines
When looking at a Network Interface attached to a VNet with an applied AVNM security admin configuration, the AVNM security admin rules are located just below those of the NSG’s.
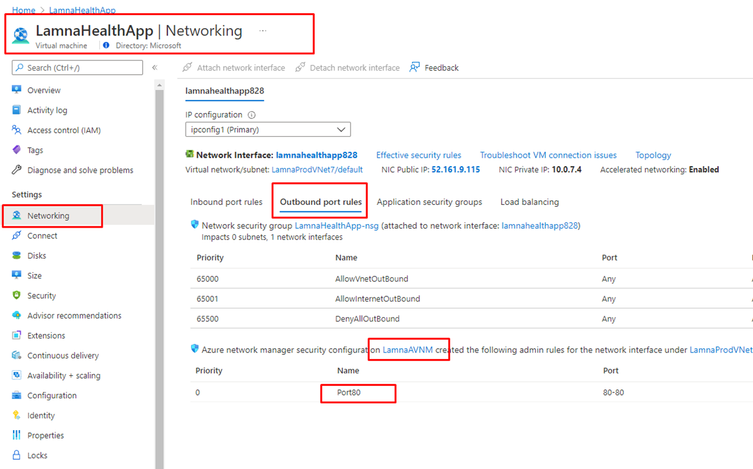
By extension, the Virtual Machine blade’s Networking section will also bubble up this information, allowing you to clearly differentiate NSG vs. AVNM security admin rules.
Deployments
So up to this point, we’ve covered the building blocks of AVNM that control what is to be configured by connectivity/security admin configurations and network groups. The final piece is deployment.
Here’s a high-level flowchart of creating an AVNM and putting it into place:
We’ve covered the first three up to this point. Now, let’s drill down a bit into step 4. A deployment rolls out configuration(s) (connectivity or security admin) to one or more Azure regions.
For the final step of implementing AVNM, we will:
- Choose either connectivity or security admin configuration type that we wish to deploy.
- Select the specific configuration(s) of that type to deploy.
- Choose any regions we want the configuration(s) to apply to. Keep in mind, if your configuration uses VNets in region 1 and region 2, then you need to select both of these regions as target regions for that configuration’s deployment.
- Deploy the configuration(s) to put it into play in our desired region(s).
Goal State Model
AVNM deployments use the goal state model, which means you define the final state you wish to have. You just tell AVNM all the configurations you wish to have as the end result, and AVNM will figure out how to make it happen and make the necessary changes for you! For example, you originally had configurations 1 and 2 in regions X and Y, and now you want to have configurations 2 and 3 in regions Y and Z. AVNM will identify the necessary changes and deliver the end result for you without the need for you to think how to achieve it. As such, to remove all the configurations, you apply a “None” configuration to your regions to tell AVNM that you do not want to have any configurations. See here for more information.
When Do You Need to Re-deploy?
Remember, as mentioned above, unless your definition of the network group is changed, you don’t need to re-deploy to reflect the changes in the VNet membership. If the network group being deployed is defined only by dynamic membership, a configuration will automatically apply to any new VNets that match the definition from deployment time on. Same with those that fall out of dynamic membership conditions. This is because your definition of dynamic membership didn’t change.
On the other hand, if you change any definitions of network groups (whether that’s a manual change of VNet membership for a static membership or the conditional statements governing dynamic membership) or the configurations after a deployment is using them, then it is necessary to re-deploy the configuration(s) affected.
Putting it all Together
So now we’ve looked at the building blocks of the new Azure Virtual Network Manager and how they fit together to control a potentially large and far-ranging set of Azure VNets. We’ve seen that AVNM is a very powerful central management tool for VNets. It can control connectivity and security across a customizable scope of VNets automatically and reduce the administrative burden for managing large (or even medium or modestly small) Azure VNet infrastructures. Overlapping network managers scoped to specific targets can provide laser-focused fine-grained impact. Different organizational resources can be given scoped-down network managers that they have control over.
This new solution can reduce the management burden of Azure VNet management significantly and offer a way to enforce enterprise standards from the highest governance level to as low and granular as desired.
AVNM is currently in Public Preview. Here are a few resources to get you started:
Azure Virtual Network Manager Product Page
Azure Virtual Network Manager Documentation
Posted at https://bit.ly/3o6dmNA


