When we use classic Cloud Service or Cloud Service Extended Support (CSES), it's a common requirement that user wants the service is only open to the clients from a specified Virtual Network. For all the other clients, for example from Internet, the request should be blocked and they cannot get any data. To meet this requirement, the feature called Internal Load Balancer (ILB), which is also called Private Load Balancer, will be needed. This blog will talk about the following three questions:
- What's Load Balancer and how does it work in classic Cloud Service/CSES?
- Why the Internal Load Balancer can make the server only open to specified Virtual Network?
- How to implement Internal Load Balancer in classic Cloud Service/CSES?
What's Load Balancer and how does it work in classic Cloud Service/CSES?
From this official document, we know that Load Balancer is a service which will be responsible for automatic load balancing and routing the traffic to different backend servers, for Cloud Service which are the different instances. Azure Load Balancer will work on layer 4 of the Open System Interconnection (OSI) system.
For Load Balancer, there are two important components that we need to know at first:
- Load Balancer will expose itself with one or multiple IP address(es), no matter with public IP address or private IP address in a Virtual Network or both. We call this Frontend IP address. Otherwise, the clients will not know how to send request to this Load Balancer.
- Load Balancer will group the backend instances. We call this group backend pool. For Cloud Service, it will create backend pool for each roles then add the instances of same role into same backend pool.
To more easily understand how this component work in Cloud Service, here is the explanation: (Here we use a Cloud Service which is only open to public Internet as example)
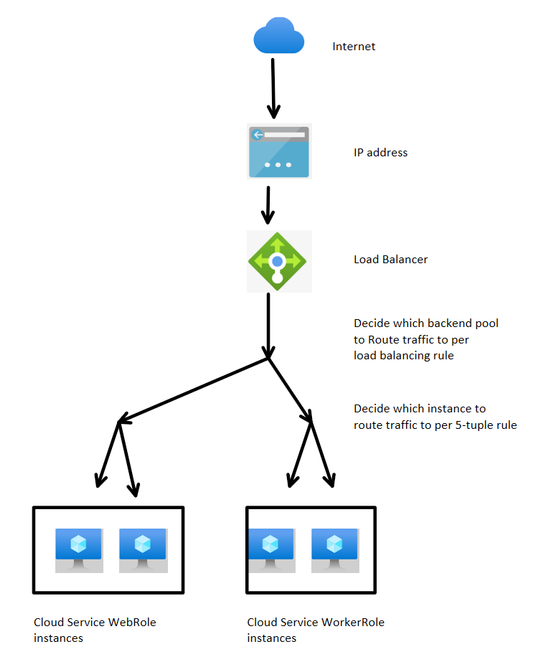
When the Load Balancer receives a request sent to him, it will decide which backend instance to route traffic by two steps:
- It will verify the load balancing rule which will check: The frontend IP address and the port of the incoming request. In every load balancing rule, we can configure with a specific combination, the traffic should be routed to which backend pools. Since our Cloud Service normally will only have only one public IP address, the main difference of load balancing rule will be the port.
- After load balancing rule, it will distribute the traffic per five tuple rule: Source IP, Source port, Target IP, Target port and protocol. If our Cloud Service will only handle http request and only has one public IP address, then the request sent from the same client will be handled by same instance.
Why the Internal Load Balancer can make the server only open to specified Virtual Network?
When Cloud Service is with Internal Load Balancer, there will be both public Load Balancer and Internal Load Balancer. Under this design, to make the server only open to specific Virtual Network, we mainly have two different ways:
1. One is to make the Public Load Balancer not exposed with any public IP address. By this way, the clients from Internet will not be able to send request to this public Load Balancer since they are unable to locate the public Load Balancer by any public IP address. The design will seem as:

2. Another is to make the public Load Balancer exposed with a public IP address but there isn't backend pool and load balancing rule added to this public Load Balancer. By this way, the clients from Public Internet will be able to send request to this public Load Balancer but the public Load Balancer will not forward the request to any of instances. So the result is the same: clients from Internet will not be able to get or send any data to the server. The design will seem as:

How to implement Internal Load Balancer in classic Cloud Service/CSES?
Since the configuration to change for classic Cloud Service and Cloud Service Extended Support is same, the following part will use Cloud Service Extended Support as example.
According to this document, there is the way about how to configure an Internal Load Balancer in Cloud Service.
1. In the Cloud Service Configuration (.cscfg) file, add a part to define the Internal Load Balancer and related internal IP address. This should be under <NetworkConfiguration> part.
  <NetworkConfiguration>
	  <VirtualNetworkSite name="Group CSILB csilbvnet" />
	  <AddressAssignments>
          <InstanceAddress roleName="WebRole1">
            <Subnets>
              <Subnet name="default" />
            </Subnets>
          </InstanceAddress>
      </AddressAssignments>
	  <LoadBalancers>
		  <LoadBalancer name="testlb">
			  <FrontendIPConfiguration type="private" subnet="default" staticVirtualNetworkIPAddress="10.2.1.250" />
		  </LoadBalancer>
	  </LoadBalancers>
  </NetworkConfiguration>
The line 10 to line 14 is the part added. It requires a name for this Internal Load Balancer (line 11) and the internal IP address and which subnet this IP address is in (line 12).
It's not necessary to keep the subnet of this Load Balancer as same of the roles but it's recommended to use the last IP addresses of the same subnet. For example, if the subnet default in the example is with IP range 10.2.1.1 - 10.2.1.255 and 10.2.1.250 is used. With this setting, it can not only avoid the network traffic block between subnets due to Network Security Group, but also avoid the discontinuity of the private IP address of the instances.
P.S. Please do remember the <LoadBalancers> part must be placed behind the <AddressAssignments> part. Otherwise a compilation error will be returned.
2. In the Cloud Service Definition (.csdef) file, add the load balancer related parameter into the <InputEndpoint>.
<InputEndpoint name="Endpoint1" protocol="http" localPort="80" port="80" loadBalancerProbe="test" loadBalancer="testlb" />
The added parameter will be localPort and loadBalancer. It's recommended to use the same number of port for localPort and use the name of the Internal Load Balancer configured in .cscfg for loadBalancer.
The completed .csdef and .cscfg file will be like:


After the modification of these files, we need to redeploy the project.
Result
Since the results of classic Cloud Service and Cloud Service Extended Support are a little different, there will be two parts.
Classic Cloud Service
After redeployment, from Azure Portal, there will be two IP addresses in the overview page, the original public IP address and the new internal IP address which is configured for the Internal Load Balancer.

The network connectivity to the Load Balancer is good.

But from browser, it's impossible to get any data.
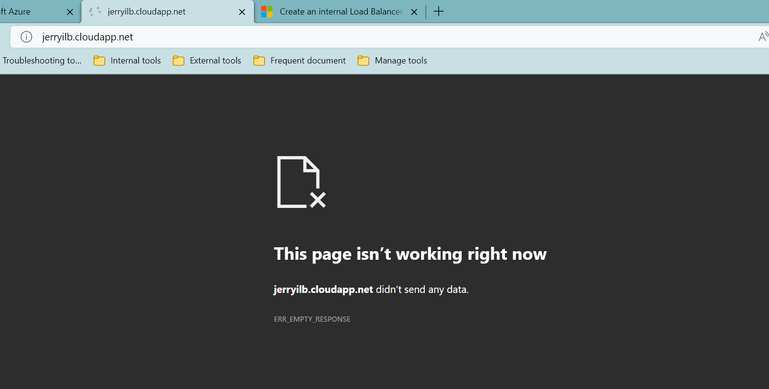
From the inside of the Virtual Network, it can be normally visited. (Here Virtual Machine with an ARM Virtual Network and Virtual Network peering are used for this test since it's impossible to create a Virtual Machine with classic Virtual Network)
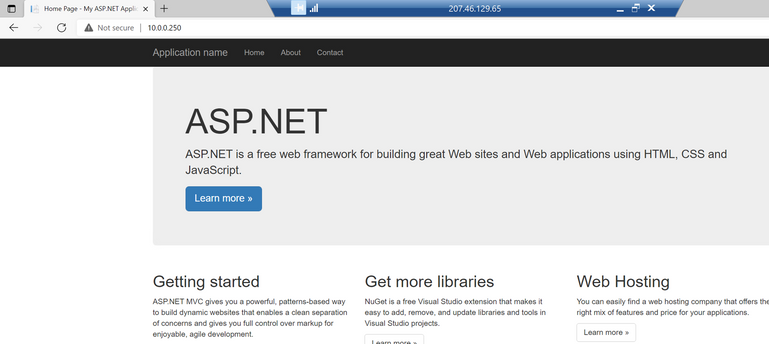
From above result, we know for classic Cloud Service, it's using the second way in Part 2 to block the traffic from Internet.
Cloud Service Extended Support
After redeployment, from Azure Portal, there will be two Load Balancer resources in the resource group. One is the original public Load Balancer, the other is the Internal Load Balancer.

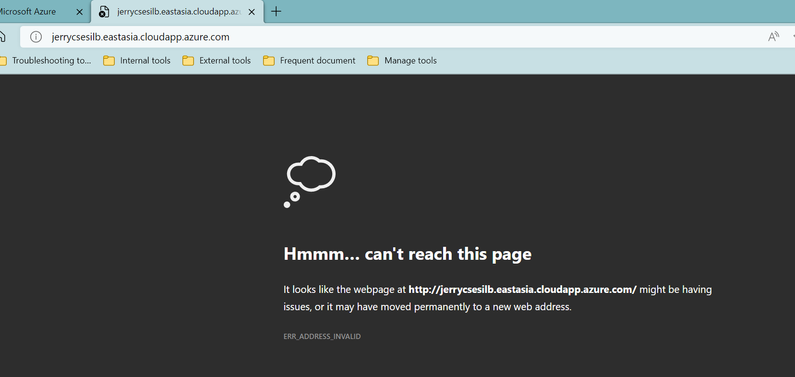
The public Load Balancer must use the public IP address as Frontend IP address. But this public IP address is without any real IP address configured. It's only with a fake domain name configured.
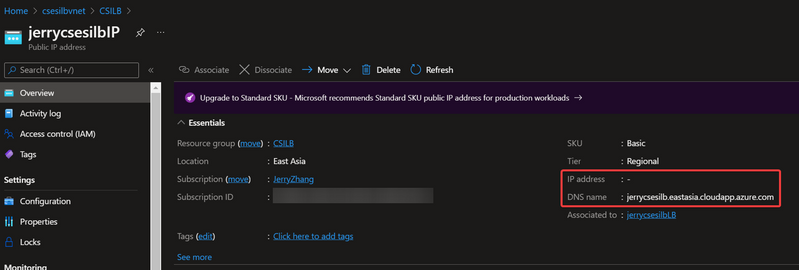
This will cause this domain is unable to be DNS resolved, thus unable to be connected in Network level.

The Internal Load Balancer settings:


The CSES overview page

From browser under Internet, it cannot be reached.
From the inside of the Virtual Network, it can be normally visited. (Here Virtual Machine with an ARM Virtual Network and Virtual Network peering are used for this test since it's impossible to create a Virtual Machine with classic Virtual Network)
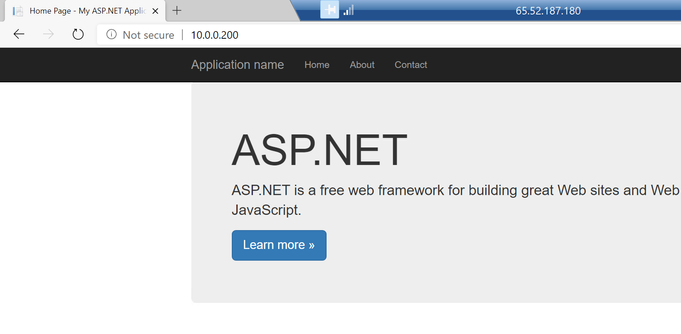
From above result, we know for Cloud Service Extended Support, it's using the first way in Part 2 to block the traffic from Internet.
Posted at https://sl.advdat.com/3Iteqlkhttps://sl.advdat.com/3Iteqlk